Updated for .NET 8.0 - April 30th, 2024

If you're self-hosting ASP.NET Core applications on IIS and using WebDeploy to publish to the server, you've very likely run into the dreaded locked file problem on the server. You start to publish to the server, and the publish fails half way through, with an File in Use error because files on the server are locked.
Regardless of whether you publish from within Visual Studio or you publish from the command line (via dotnet publish or MSDeploy) you have probably run into this issue:
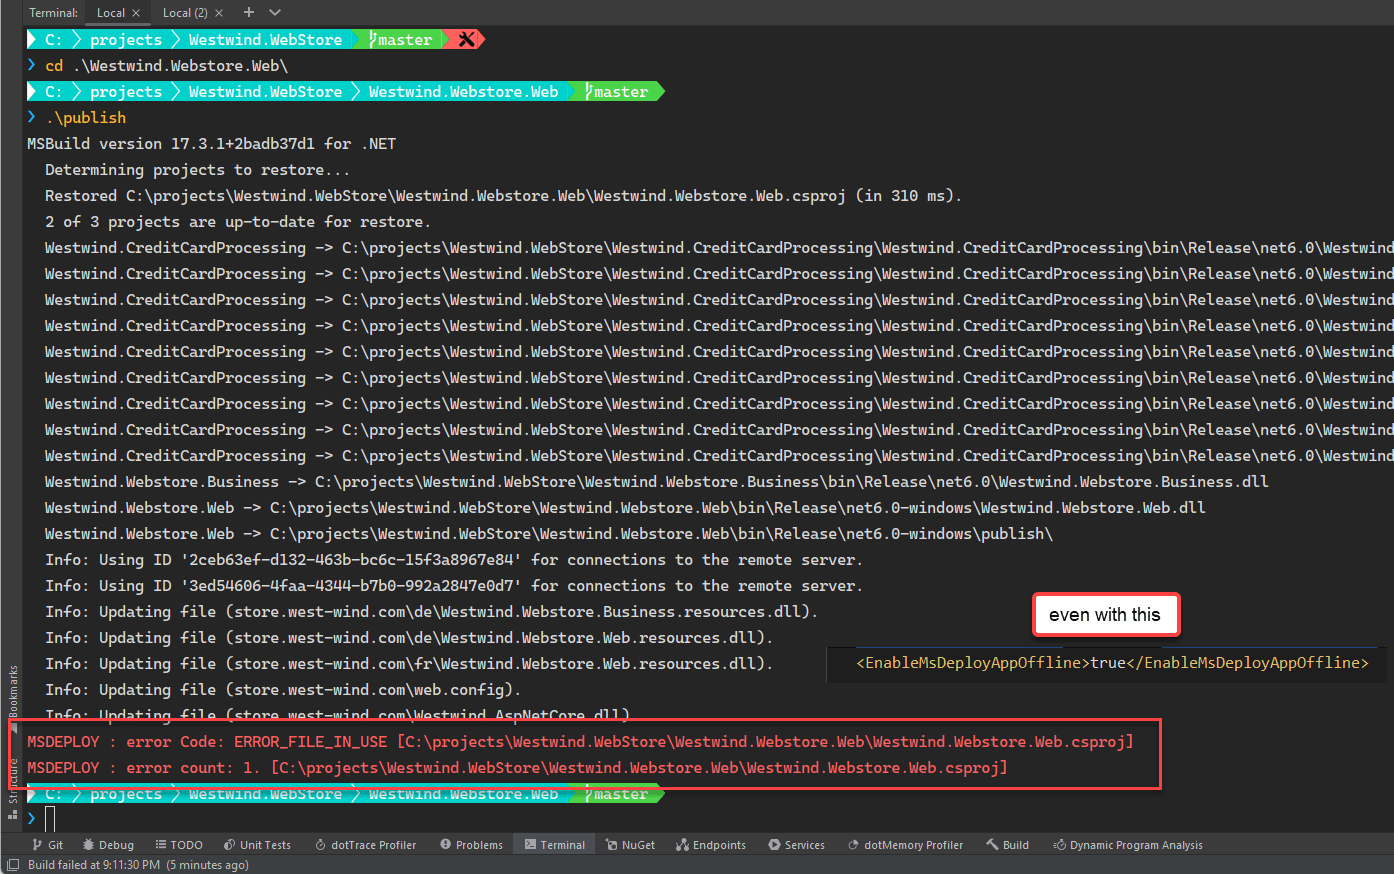
The error is the dreaded ERROR_FILE_IN_USE which indicates that one of the files - most likely one of the application assemblies is use.
This means when applications are shut down for updates from WebDeploy, sometimes it's possible to retry and succeed, but at other times this update never succeeds. This happens even, if the AppOffLine.html option is enabled in the profile, which is supposed to unload the app before it starts updating. Alas - it does not, at least not always.
In this scenario, not only did the publish not work, but most likely you've just screwed up your live deployed site as files were partially published leaving the app in an inconsistent state. It'll also leave around an app_offline.htm which signals IIS to show that page (which is empty by default) leaving your site dead in the water.
The solution in the past has been - let the punishment continue until morale improves: You try again, and if necessary recycle the App Pool or IIS on the server then try again.
That sucks big time!
Long story short in .NET 6 and later Microsoft has brought back Shadow Copy deployment for IIS publishing via Web Deploy, which can alleviate these issues.
I'll break this post down into two major sections:
- Part 1: Shadow Copying - What is it, what problem does it solve, and how do you use it
- Part 2: Setting up WebDeploy for Publishing to IIS both on the client and server
The latter is obviously out of order, but Web Deploy is so badly supported and even more badly (:smile:) documented that I thought it'd be useful to add it to this post, if for nothing else than my own reference.
But before we get to the solution, let's talk about the problem.
Why are Files Locked Files in ASP.NET Core Applications?
Unlike classic ASP.NET applications, by default ASP.NET Core applications are hosted and execute in place when running in IIS or anywhere else. This means that the application runs directly in the location that it is deployed in and loads all files out of that folder which Microsoft calls the ContentRoot.
On IIS, ASP.NET Core is hosted through the ASP.NET Core Hosting Module (ANCM) which is responsible for firing up the .NET Runtime - either in-process or out-of-process - and starting up your .NET core application. The module handles translating IIS's inbound data stream so ASP.NET Core can consume the data using the familiar ASP.NET Request/Response/Server model.
In-Process or Out of Process
In general you'll want to use InProcess hosting with IIS as the message passing between IIS and the ASP.NET Core framework is much quicker than out of process hosting, which sends proxy HTTP requests to an externally running Kestrel .NET Core process.
For publishing to a self-hosted IIS Web site, WebDeploy is the tooling technology you can use to publish ASP.NET Core applications. WebDeploy can handle file copying, is supposed to unload the running application (with mixed results), updates files and then is supposed to restart the application.
Although WebDeploy has a basic mechanism of unloading the running Application on IIS before copying files using AppOffline.html, often this simple IIS unload mechanism fails, and files continue to be locked. Usually this is due to the application still running pending requests or running some background operations that have not completed and released their background threads. End result: In some cases the IIS application does not unload.
Sometimes you can wait a little bit and try again, but if the application is super busy or has long running requests or background services it might be increasingly difficult to update the application without explicitly shutting down the Web application on the server.
This experience sucks, especially if you need to get a fix out quickly. Even worse in some scenarios this can leave your application in a non-running state as some files were updated and others did not. Unfortunately, this default behavior is not uncommon.

Part 1: Shadow Copying
Thankfully with .NET 6.0 and later an oldie but goodie feature called Shadow Copying is now available for ASP.NET Core apps. This feature originated in Classic ASP.NET where it was the default deploy scheme, but it is not the default behavior in ASP.NET Core which executes binaries in-place in the original deploy folder.
Unlike in-place execution where binaries are run from where they are copied, Shadow Copying copies files into a separate temporary folder in addition to keeping them in the actual deploy folder. Files are published to the deploy folder first and a background operation in IIS then detects that the binaries have changed and copy the files to a secondary, temporary location.
Once the copy operation is complete, the application is restarted with binary file loading re-directed to retrieve binaries from the temporary, shadow copy location.
In .NET Core this, this is how the ShadowCopy behavior works:
Environment.CurrentDirectory continues to reflect your original deploy folder - the application isn't actually running out of the shadow deploy folder. But if you check the currently executing assembly you'll find that it is executing out of a temporary folder.
It looks like the IIS Hosting module is redirecting assembly loading to the temporary folder, so assemblies load from the there, rather than the original deploy folder, while actually running out of the original application folder where the application was installed.
The following shows values for:
Environment.CurrentDirectory - deploy folderAssembly.GetExecutingAssembly().Location - temporary shadow copy folder

ASP.NET Core doesn't use Shadow Copying by Default
ASP.NET Core doesn't use Shadow Copying by default and as a result - even with AppOffLine.html it's frequent to see publish operations on IIS fail.
The good news is that as of .NET 6.0 shadow copying is back - albeit as an experimental and optional feature that nevertheless works as advertised. As of .NET 7.0 this is an officially supported, non-experimental feature.
The shadow copying behavior in ASP.NET Core is provided as part of the ASP.NET Core IIS Hosting Module (ANCM) that manages hosting .NET Core application inside of IIS. This module behavior handles monitoring the Web folder for changes and copying files to a new temporary location, then re-launching the ASP.NET Core application and referencing all binaries from that temporary folder.
Enabling Shadow Copy Folders in .NET 6.0+
Shadow Copy deployment is a new, experimental feature in .NET Core 6.0 and an official feature in .NET 7.0 using a set of <handlerSettings> keys in web.config. This feature is implemented as part of the ASP.NET Core IIS Module (ANCM) and configured via configuration settings in the <aspNetCore> key in web.config.
After implementing this on several of my own IIS applications since the early .NET 6.0 days, I can safely say that it works without any issues for me and I get now reliable deploys that don't get hung up on file locking errors.
This is in contrast to the frequent and somewhat random ERROR_FILE_IN_USE errors I was getting previously. I'd say roughly 3 out of 10 installs would fail for me prior to using Shadow Copy. Now, no locking failures any more.
So yay, Shadow Copy!!!
Configuring Shadow Copy in web.config
Because Shadow Copy is not an application feature, it's not set in your .NET Core project file. Rather it is implemented as part of the ASP.NET Core IIS Hosting Module and therefore configured in web.config.
<aspNetCore processPath=".\Westwind.Webstore.Web.exe"
            hostingModel="inprocess"
            stdoutLogEnabled="false"
            stdoutLogFile=".\logs\stdout" >

 <handlerSettings>
   <handlerSetting name="enableShadowCopy" value="true" />
   <handlerSetting name="shadowCopyDirectory"
                   value="../ShadowCopyDirectories/WebStore" />
 </handlerSettings>

</aspNetCore>
Shadowing copying is officially supported in .NET 7.0 and later. In .NET 6.0 it was an experimental feature and marked as such in the key settings:
<!-- in .NET 6.0 use this instead -->
<handlerSetting name="experimentalEnableShadowCopy" value="true" />
It also appears that the experimental key still works in .NET 7.0 for now.
You enable the feature and provide a folder name. The folder name can be a relative path as in the example, or a fully qualified OS path. You can point multiple applications at the same Shadow Copy folder, as the unique temporary folders are created underneath that folder with a unique ID.
Here's what the shadow copy folder looks like for the above setup:
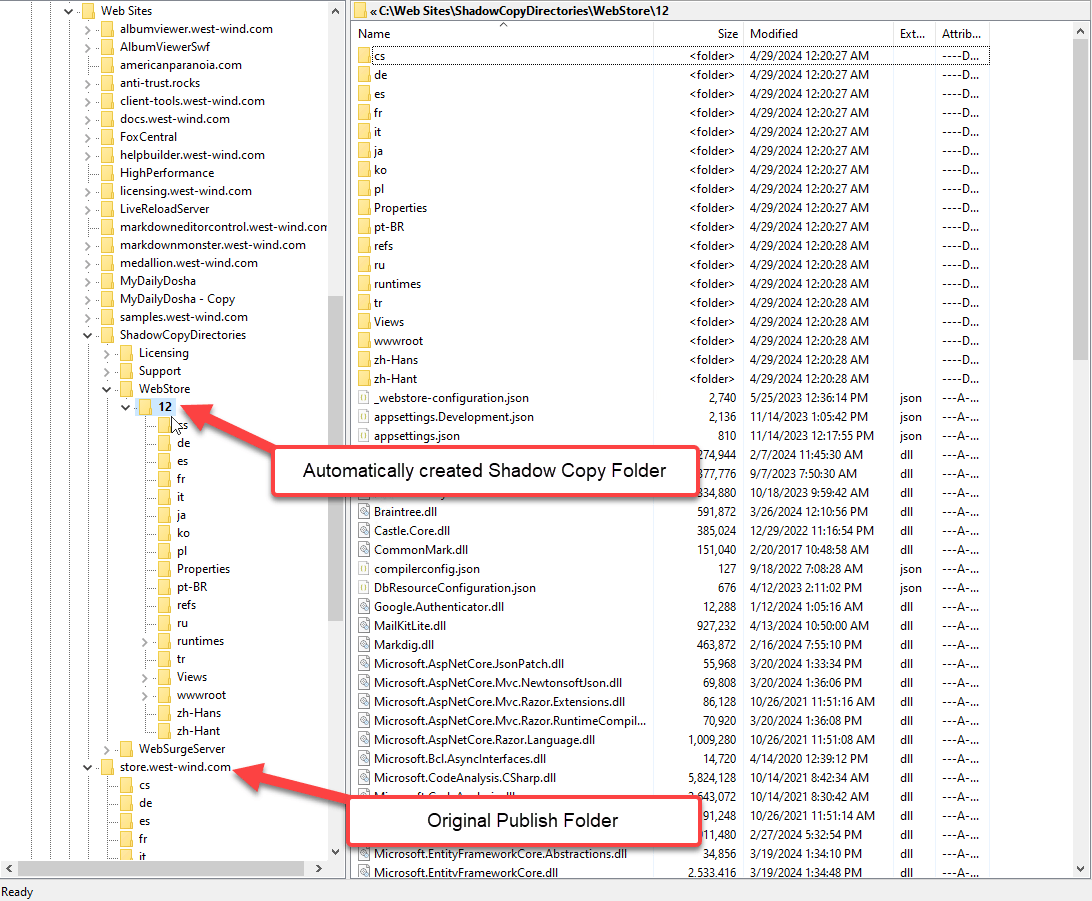
Each application and each 'change' in the application generates a new shadow copy folder. The ASP.NET Core handler figures out whether it needs to create a new shadow copy folder, can reuse an existing one and also cleans up no longer running shadow copy folders.
All of this works very well and has eliminated any publish errors for me due to file locking. This is a simple fix for an annoying problem and I'm very glad to see Shadow Copying again supported for publishing.
Again: Yay!
Caveat: For multiple Apps, Use Dedicated Folders for Each App!
Although the documentation doesn't mention it and WebDeploy creates unique folder for each shadow copied application that it applies to, it's a good idea that if you have multiple Web applications that use Shadow Copy to use separate folders for each application.
I recently ran into some problems related to this very issue where I had 4 applications all using the same Shadow Copy Directory folder. In this scenario I ended up with startup problems in all 4 applications as they each corrupted the others by copying and deleting files in the other folders.
While that particular problem might have been due to a (hopefully shortlived) regression bug in the ANCM, it's safe to say that using separate folders - perhaps under a common base folder - is guaranteed to sidestep any unintentional file deletion or corruption. Plus: It also makes it easier to clean up the Shadow directory folders for a specific application or quickly double check the folder for actual executing files.
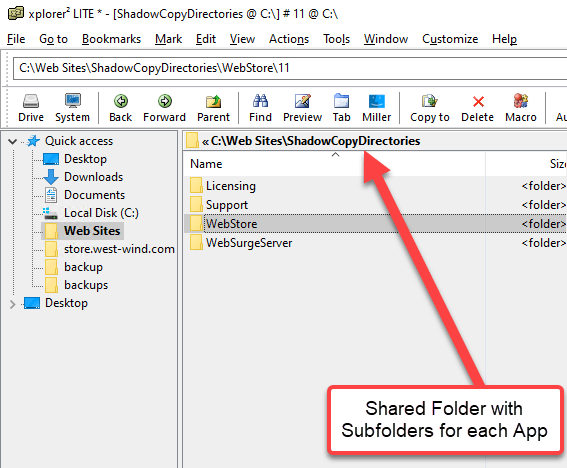
As you can see in the screen shot above I put my shadow copy folders all below a common ShadowCopyDirectories folder and then have application specific subfolders below that folder.
Caveat: Permissions Required for ShadowCopy Folder!
In order for shadow copying to work you have to make sure that the IIS Application Pool Identity account has full access to create folders, and write files in the ShadowCopy folder.
It's best to create the folder that will be used and then assign the appropriate full access permissions to that folder.
ApplicationPoolIdentity: Choose a different Account
Note that this can be problematic if you use the default ApplicationPoolIdentity account, which isn't a standard Windows account and that has practically no machine rights whatsoever. It won't be covered even if you were to assign EveryOne for full rights on the ShadowCopy folder (which I wouldn't recommend in any situation - be precise with your full rights assignments!).
ApplicationPoolIdentity also doesn't show up in the Windows account list so you can't easily assign permissions to a folder for it. There are ways to make that work (using raw ACLs), but it's probably easier to switch to an explicit account for your application pool either by creating a new account with the exact permissions you need or using one of the Windows generic accounts like NetworkService.
Potential Problems with Shadow Copying
While Shadow Copying has fixed all of my issues, and I haven't run into any issues personally, it's important to point out that there can potentially be some issues that have to do with timing the file copy operation properly and the new location assemblies run out of.
For me personally, switching from in-place, to shadow-copy was a zero change event, all I did is add the handler settings in web.config and got to enjoy no lockup publishing and the same application behavior as before.
Restart before Copy is Complete
But I do remember running into issues with partial updates with classic ASP.NET especially on large applications.
It's feasible that if you have very large publish distributions that multiple shadow copies occur, potentially leaving the application temporarily in an unstable state. Once copying is complete, this always sorts itself out, but on rare occasions you may end up with an incomplete application briefly.
I've not seen that in my applications, mainly because the apps are not very large and self contained. The larger the distribution the more likely to run into a situation where Shadow Copy processing considers the app update complete, while more files are still published.
Relative Assembly Paths
Another potential problem is that if some component relies on Assembly.GetExecutingAssembly() or Assembly.GetEntryAssembly() and makes assumptions based on that location, there could be problems due to the relative path changes. This can cause problems with files getting copied to a temporary location instead of into the application structure for example or it could be something internal like a dynamically loaded assembly not being found where it's expected to be.
Make sure you Test First, Ask Questions Later
If you plan on using Shadow Copy make sure you test your application publishing to make sure everything works as expected.
Don't take my word or my specific application scenarios for it - do your own Due Diligence and test your application to see if there are any of the rare side effects that might apply to you.
Shadow Copy Summary
If you've run into publish problems on IIS using plain Web Deploy publishing, you should definitely take a look at Shadow Copying files as it almost certainly will eliminate any locking issues in your applications. However, make sure that you test for any of the minor problems that can creep up due to the changed locations of the binary assemblies loaded from Shadow Copied file.

Part 2: Setting up and Running WebDeploy with .NET Core apps in IIS
If you're new to publishing to IIS or it's been a while you probably could use a quick refresher on what you need in order to use Web Deploy both on the client and on the server.
Make sure that the WebDeploy is installed
Although the .NET Core SDK supports publishing via WebDeploy, the feature is not automatically installed with the SDK. You have to separately install WebDeploy first.
You can install Web Deploy from:
These installers will install both the Web Deploy client and also the server IIS addin, if IIS is installed locally. If IIS is not installed and you later install it you'll have to re-install WebDeploy at that time.
A Word about the Web Deploy Agent Service Server Component
The Web Deploy server component installs as Windows Service called Web Deployment Agent Service with a dependency on the Windows Http service which is used for communication.
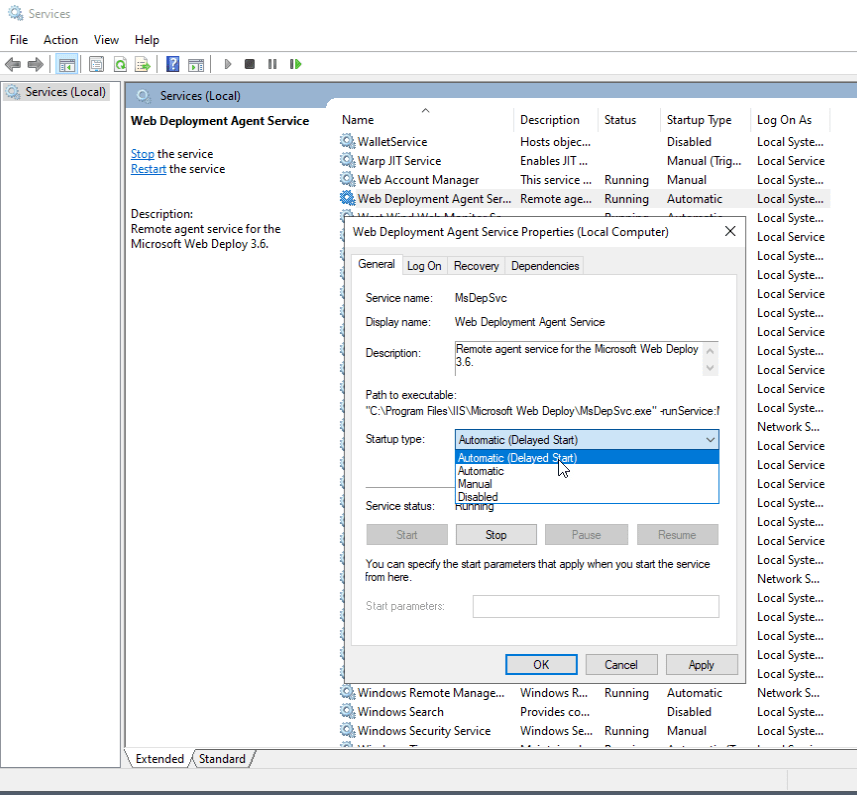
You'll want to make sure the service is started and running - otherwise you won't be able to connect to it.
Make sure the Service is running
If for some reason you can't connect to the Web Deploy server, make sure to double check that the Web Deployment Agent Service is actually running!
I've noticed in some cases that starting with default service startup setting of Automatic the server fails to start when the machine starts up. Instead using Automatic (Delayed Start) is more reliable for ensuring the WebDeploy server is started on machine restarts.
Create a Web Deploy Profile in Visual Studio
In order to publish from the client you need to create one or more Publish Profiles that tell WebDeploy where and how to publish your Web application. Publish Profiles are XML files that are used by command line tools to execute, but Visual Studio and other IDEs have UI tools that help create these profiles more interactively.
The easiest way to create a new publish profile from scratch is to let Visual Studio (or Rider) to create a profile for you from your .NET Web application. The following uses a .NET Core project, but it also works with most other Web project types including classic ASP.NET projects. Otherwise you can also just copy an existing .pubxml file and modify the configuration.
In Visual Studio:
Right click on your Web project, then select Publish
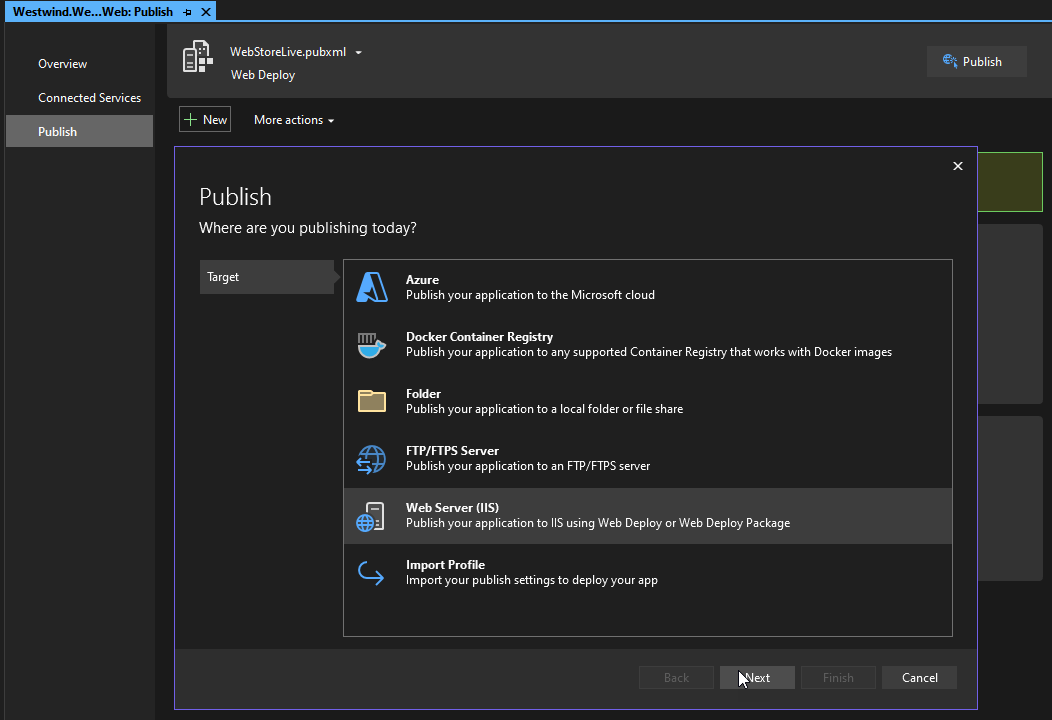
You then choose Web Deploy as the publish type and fill in your Web site information:
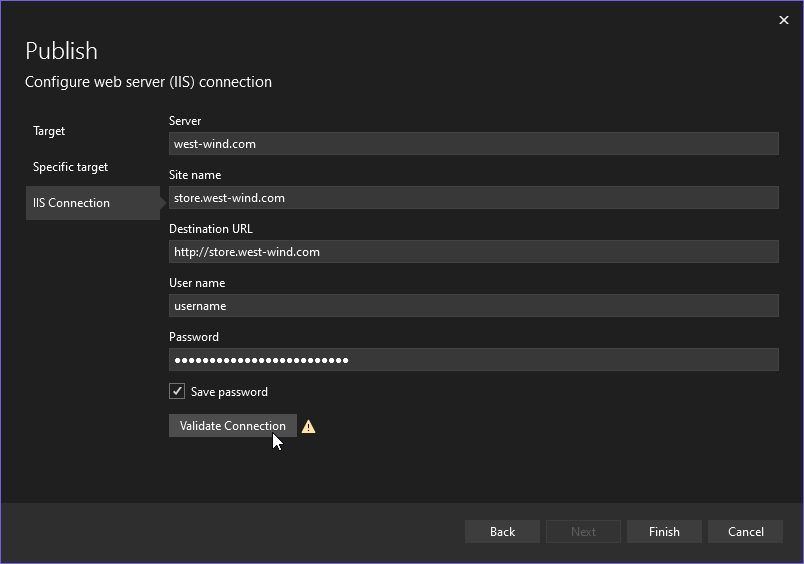
Server
You need to specify a domain name here that you want to publish to. You can use either:
- A domain or IP Address on its own (ie.
www.domain.com)
- An http url:
http://mydomain.com
- NOT an https url:
https://mydomain.com
Regardless of whether you use a domain or url the value is parsed into an internally used URL that communicated between Windows machines using your Windows credentials.
Example: mydomain.com
Site Name
This is the IIIS site name to which you want to deploy. The site has to already exist and have a valid root folder. The Site name is the description you see for the site in the IIS Manager application for each site. You can also specify virtual directories using / to separate the site name and virtual.
Example: store.west-wind.com or west-wind.com/wconnect
Destination Url
This is an Url value that's used to open the site after publishing is complete and should just point at your Web Site. I noticed that this URL should be http:// - even if it auto-redirects to https:// or else the validation fails.
Username and Password
In order to publish you need to authenticate on the server using a Windows Administrative account. If this doesn't work also make sure the <AuthType> key in the .pubxml is set to NTLM.
Validate Button
You'll want to validate the settings by clicking this button. If all is well you'll see a little checkmark, if not you'll get an error icon that you can click for error info.
- Common Validation Errors
Common problems are user validation failing (credentials, non-admin account), WebDeploy service not running on the server, server not resolving or firewall is blocking requests.
A Web Deploy Profile
The interactive tool simply creates a Publish Profile .pubxml file which by default is stored in your project at:
- Properties/PublishProfiles
You can also create these profiles by hand and skip the Visual Studio or other tooling by simply copying and modifying an existing profile which tends to be much quicker. Once you've created the profile, if it lives in to the Properties/PublishProfiles folder it'll also be visible in Visual Studio and Rider as an available profile by its filename in the publish options.
You can create multiple profiles to multiple servers, so you can easily set up profiles for Production, Staging, Backup etc.
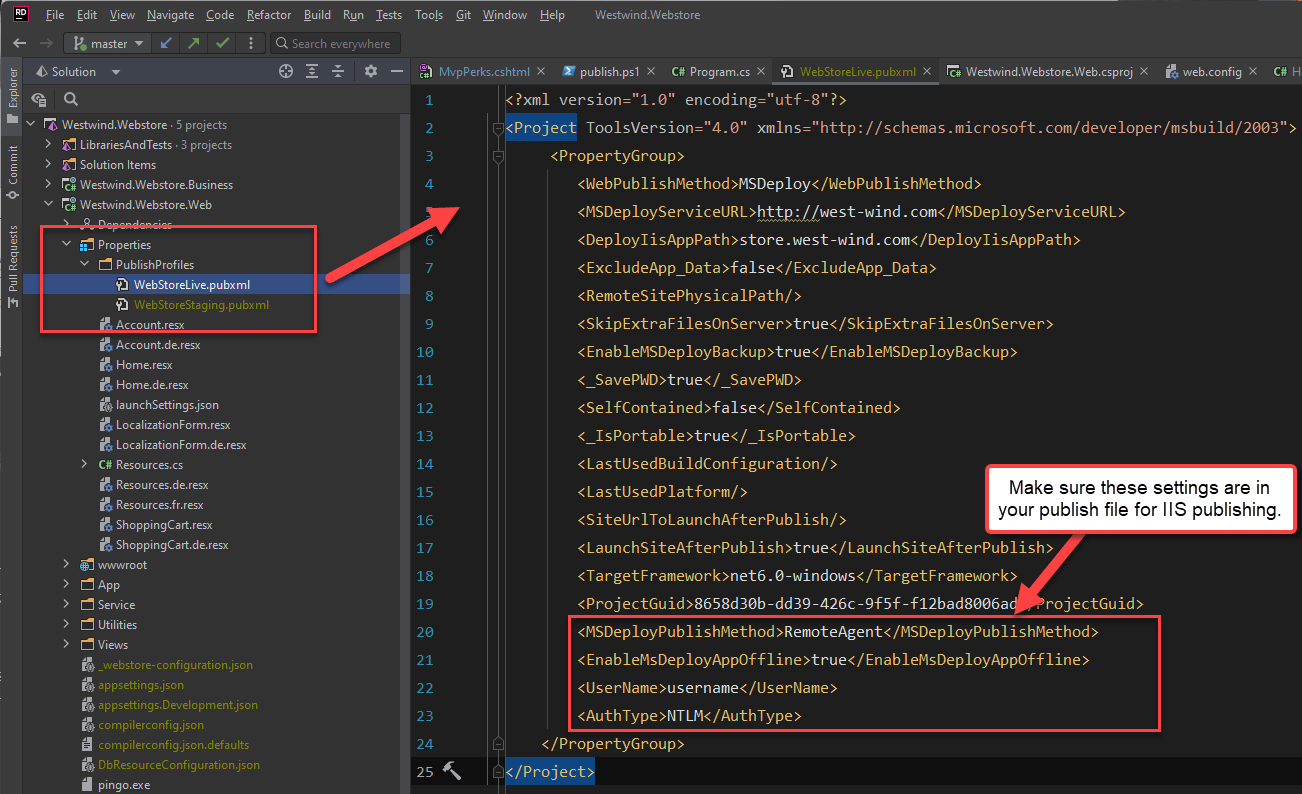
In this publish file there are a few keys that are important that may or may not be in your automatically created profile (depending on your version of Visual Studio):
EnableMsWebDeployAppOffline
Ensures that the WebDeploy places an AppOffline.html file in the deploy folder before updating files. This file causes IIS to unload the currently running App Pool and keep it from restarting until the file is removed. This setting wasn't the default until very recently in Visual Studio (v17.2+)
MsDeployPublishMethod
Use RemoteAgent for this setting. I've had a number of issues with connections failing, and when they did this setting made it work. This setting should be the default for WebDeploy but explicitly setting it ensures it is always used.
AuthType
WebDeploy always uses Windows Authentication or NTLM but in some instances the default for this setting is not NTLM resulting in authentication failures. Explicitly setting to NTLM ensures that the right authentication is used for Web Deploy.

Publishing from Visual Studio
Once you've got one or more publish profiles set up, you can then use them to publish to the server easily using... wait for it... right click deploy.
In Visual Studio you can publish from the project's context menu:
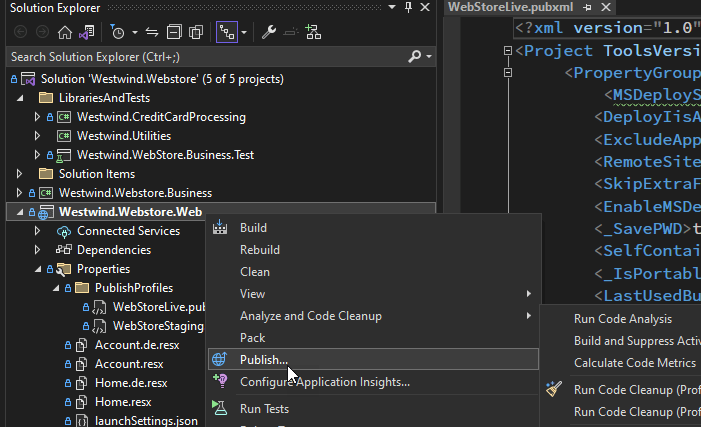
From there you can the publish:
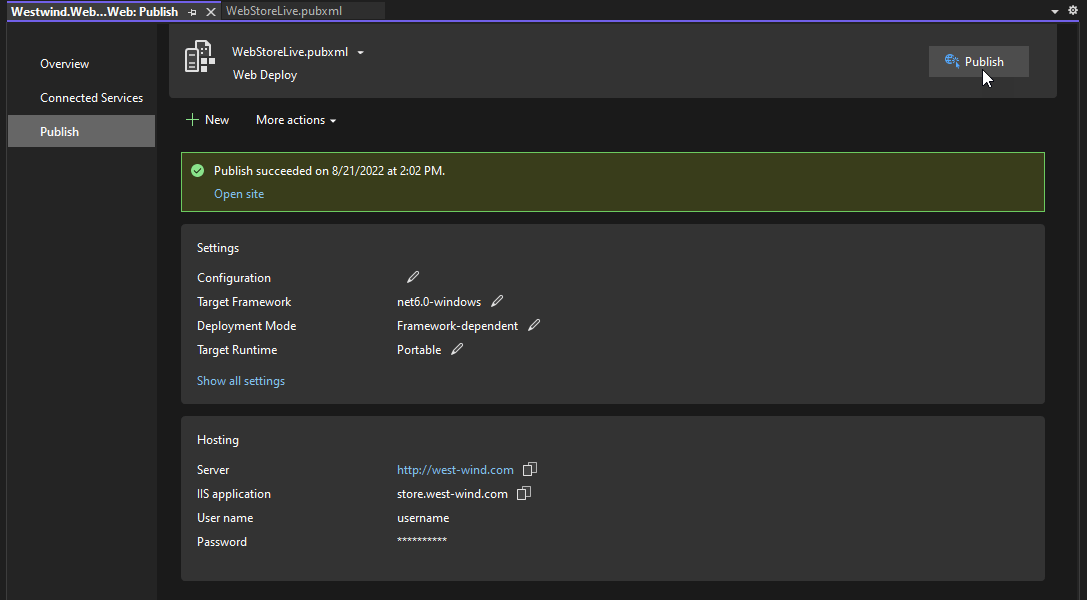
Done and Done.
Publishing with dotnet publish
For those that hate Push Button Deploy there's also Command Line Deploy which is really still Push Button deploy but with more keystrokes - but hey at least you can look cool and pretend it's more sophisticated 😄.
The .NET SDK has support for publishing Web applications including publishing to IIS via WebDeploy using the dotnet publish command. The process is very simple and boils down to a single command:
dotnet publish /p:PublishProfile=Properties/PublishProfiles/WebStoreLive.pubxml `
               /p:Username=$uid `
               /p:Password=$pswd -c Release
You can pass any MS Deploy parameters here via the /p: flags, but
Web Deploy is a Separate Install from the .NET SDK
Although you can publish to WebDeploy with dotnet publish, WebDeploy is not installed with the .NET SDK, so you still need to install the Web Deploy client explicitly as discussed earlier.
Visual Studio on the other does install WebDeploy since the publish tooling is integrated. Rider downloads it as a plugin on the fly with similar on demand behavior.
Using .NET Publish in this way allows you to automate the build process via simple scripted PowerShell or Command scripts or you can integrate this process into a DevOps build pipeline, or combine commands to provide a sequence of events. For example, on some of my bigger applications I push to a separate Git publish branch with a Tag before publishing to have an full current state of the published application that I can roll back to if something goes wrong.
Summary
WebDeploy is old technology and it shows. All sorts of quirks from the funky options to choose domains, http:// only URLs, to funky file locking. But, once you have a connection, it actually works surprisingly well with its options to incrementally update or do a full nuke and start over installation.
WebDeploy and 'push button' deployment is frowned upon by many, but if you're not on a dedicated server platform like Azure or AWS, WebDeploy continues to be a very useful tool. And with only a little bit automation via dotnet publish (or directly using MSDeploy) you can create a robust publish process without a full dev pipeline while still having reliable fallbacks and options to do A/B publishing and multiple publish environments. Or - just do the push button deploy, as I still often do for many of my mostly static content Web sites where I literally push button deploy from Visual Studio or from CLI from VS Code with a single batch file without any fanfare. It works and does what it should... so use it for what it's good for!
Other Posts you might also like