


Using .NET Core Tools to Create Reusable and Shareable Tools & Apps
Starting with .NET Core 2.1 Microsoft introduced the Dotnet Tools platform as part of the .NET Core SDK and since then these tools have become a vital although underutilized part of the .NET Eco system.
Dotnet Tools are a simple way to create, publish and consume what are essentially .NET Core applications that can be published and shared using the existing NuGet infrastructure for packaging and distribution. This means it's really quick and easy to build tools that you can share either publicly or privately.
What is a Dotnet Tool?
When you break down a Dotnet Tool it boils down to its simplest terms you end up with this simple statement:
“A Dotnet Tool is a glorified.NET Core Application that can be quickly and easily shared and installed via NuGet.”
me, 2020
The idea behind a Dotnet Tool is to make it easy to build, publish and consume executable tools in the same way you've been able create NuGet packages for .NET and .NET Core components.
And while the original idea was to build tools to aid as part of the build and development process, this platform really offers a much wider scope because you can publish and share any .NET Core executable application. This includes servers that run full ASP.NET Core applications or services, and even .NET Core desktop applications.
Why use Dotnet Tools?
While the idea behind Dotnet Tools isn't anything new, this tooling does provide a number of benefits to developers and the entire .NET Core eco system. The big selling points are:
Easy to use
- Single command install. Example:
dotnet tool install -g LiveReloadServer - Global path access to run command:
LiveReloadServer --help
Easy to build
- Uses standard .NET Core Projects
- Uses existing NuGet Infrastructure
- Nothing new to learn - works with existing tech
- Configured via standard
.csprojsettings
Sharing
- Can be easily shared
- Can reach a large number of users via NuGet
- Quickly published and available
- No explicit package validation
Community
- Ease of use and shareability promotes creation of tools
- Shared content helps build community
On the flip side there is a big prerequisite to using a Dotnet Tool:
- The .NET Core SDK is required to install a Dotnet Tool
The SDK dependence is both a blessing and a curse: Because it's guaranteed that the .NET Core Runtime is installed, binaries of your Dotnet Tool can be very small and only consist of application specific files. But the .NET SDK has to exist on the target machine and the SDK install is neither small, nor something that a typical, non development user will already have installed.
Global and Local Dotnet Tools
Tools can be installed either as a global or local tool. Global tools are easily accessible on the local machine in a central and path mapped location. Local tools are specifically installed 'locally' into a subfolder folder and only accessible from there. This is often useful for build tools and CI systems that need to install tools are used in the application build process.
In this article I focus primarily on the usage for global tools and the sharing aspects of Dotnet Tools as general purpose utilities, although many of the concepts and operations also apply to local tools.
Careful: Security of Dotnet Tools
Since Dotnet Tools are executables that are installed from a remote source and there is no validation process for published tools, it's important to understand that there is a potentially substantial security risk to your machine. The code that comes down can execute locally on your system and has access to your local resources when you run a tool.
Be sure you trust the publisher of the tool, and/or verify that the source code is available somewhere to review and check for issues in the project.
Be careful and know the risks!
To be fair, the same cautions apply to NuGet packages since those too can execute any code contained in the package and there's not much concern around that.
There's nothing new under the Sun!
“Did you just describe NPM?”
Yup: Dotnet Tool is very much like NPM for .NET Core.
If all this looks familiar from NodeJs and NPM - you're right. The idea of shared tools is not new by any means and follows various other development platforms and their package managers. But for .NET to easily publish and share binary executable tools in a cross-platform manner is relatively new and exciting and opens up the reach of small and useful tools that otherwise would never be shared.
What can you use Dotnet Tools For?
Although .NET Tools were initially designed to provide development time tools, compilation helpers, build tools etc., it turns out that Dotnet Tools are just plain .NET Core executables that can do anything that a .NET Core executable can do. This means you can use it for all sorts of things that might not be directly developer related.
Here are a few general use cases addressed by Dotnet Tools:
Build and Dev Time Tools
There are many tools that follow the original design goal for creating project helpers that make development tasks easier or facilitate external but related development operations. For example, tools like EF migration commands indotnet ef,dotnet watch run, and the user secrets manager, dotnet watch are all Dotnet Tools that fit this bill. There are many tools available in this category.Generic Command Line Tools
If you need to build some complex command line helpers that work on scenarios that are more complex than what you reasonably want to do in PowerShell or Bash, a tool can fit that niche nicely. Because these tools can be shared and installed easily and are generally very small they make a good fit for 'beyond scripting' scenarios.Local Servers
.NET Core makes it easy to build server applications and it's easy to create self-contained Web Server or Services applications. Whether it's running a Web application locally for testing, or whether you have some internal application that maybe is a hybrid that uses both a Web interface and a desktop application in mixed mode, a Dotnet Tool makes it easy to provide this. It's very powerful to be able to create small and easily shareable, self-contained Web and server applications. I'll show a couple of examples of this later.Desktop Applications
Although Microsoft's official documentation claims thatDotnet Toolis meant for Console Applications, it turns out that you can also create desktop applications and share them as a tool. You can create .NET Core WinForms and WPF applications and package them as tools too. Keep in mind though that WinForms and WPF applications are platform dependent and have to run on Windows, unlike pure Console applications which can run on any supported .NET Core platform assuming they are not using platform specific features.
Locating Dotnet Tools Available
Unfortunately, finding all .NET Tools that are available is not so obvious. Puzzlingly the NuGet Web site doesn't allow any filters for searches that filter for just Dotnet Tools.
There are a couple of other places you can check though:
Nate McMaster has a GitHub repo with a list of many Dotnet Tools
The ToolGet Site searches NuGet with a Dotnet Tool filter!
Looks like Microsoft has very recently added support for searching for Dotnet Tools via Filters that have been added, so it's a bit easier now to do this right on the NuGet Site.
Dotnet Tool or Platform Specific Binary?
.NET Core supports creating executable binaries for every platform that it supports. But each platform requires a custom executable launcher and runtime dependencies to run, which means each platform distribution is different.
It's possible to create standalone executables for each platform using either a pre-installed .NET Core runtime installation, or a fully self-contained executable that can contain all the required runtime files in addition to the files that your application needs to run. Self-contained applications are great for self-reliance and predictable behavior, but they are terribly large as the runtimes make up a minimum of 70mb of distribution size.
A full self-contained application is useful and sometimes required, especially for non-developer related tools. If you're building an end user tool or application, then a self-contained application is usually a better call. But if you're building developer tools the Dotnet Tool experience is often preferable. Dotnet Tools are definitely targeted at developers and not end users.
The advantage of building a .NET Tool is that a Dotnet Tool is not platform specific. Like a NuGet component package, the executable is actually just the compiled .NET assemblies packaged into a NuGet zip file. This file contains the .NET executable code, that is not tied to any platform - ie. there's no platform specific binary loader as you would have with an EXE file on Windows for example. Since Dotnet Tools rely on an SDK installation to run, the runtime is guaranteed to be there. If dotnet tool can run, your tool can run.
This means you can build a single, relatively small NuGet package as a Dotnet Tool and it will work on all supported .NET Core platforms - assuming your code is written to otherwise use platform agnostic features. That's cool: It provides you cross platform functionality without having to build and maintain any platform specific loaders and it keeps the deployment size very small.
As an aside, you can also achieve the same cross-platform behavior with a .NET Core Runtime installation and using dotnet run but that's considerably less user friendly as you have to deal with paths and installation folders. A Dotnet Tool abstracts all that away so you just have your executable to run.
Creating and using Dotnet Tools
Let's jump in and see how you can:
- Build a Dotnet Tool package for distribution
- Publish a Dotnet Tool package
- Consume a Dotnet Tool package
Create a Dotnet Tool Step by Step
Let's create a very simple project MagicWindBall that 'predicts' Wind conditions for the day. It's a play on words of Magic Eightball which is a fake fortune telling device and I'm highjacking the idea to tell me my wind fortunes.
Start by creating a .NET Core Console project. I'll use the dotnet Command line tooling, but you can also use Visual Studio (or Rider etc.) to create a new .NET Core Console project.
From the command line, start by creating a new folder with the Project name, and then create a project in that folder:
mkdir MagicWindBall
cd MagicWindBall
dotnet new console
code .
This creates a new project MagicWindBall.csproj which you can open in Visual Studio or Visual Studio Code. I'll use VS Code here as shown in Figure 1, which makes it easy to open the projects from a folder via code ..

Figure 1 - Opening and running the Console project in Visual Studio Code
This project is silly simple, with an imaginary wind forecast generator that randomly displays a string from a list of pre-defined wind condition strings.
The code is along these lines: (full code on GitHub at https://github.com/RickStrahl/CodeMagazine-DotnetTools/blob/master/Source/MagicWindBall/Program.cs)
static void Main(string[] args)
{
    WriteWrappedHeader("Magic WindBall");

    Console.WriteLine();

    Write("thinking.", ConsoleColor.Cyan);
    Wait(500);

    Write(" consulting the stars.", ConsoleColor.Yellow);
    Wait(1000);
    Write(".", ConsoleColor.Yellow);

    Write(" guessing some more.", ConsoleColor.Cyan);
    Wait(1000);
    Write(".", ConsoleColor.Cyan);

    Console.WriteLine('\n');

    var rnd = new Random(DateTime.UtcNow.Millisecond);
    var val = rnd.Next(6);

    Console.WriteLine("Wind today be:");

    switch (val)
    {

        case 0:
            WriteLine("No Wind - Skunked again.", ConsoleColor.DarkYellow);
            break;
        case 1:
            WriteLine("Light Wind - Take a nap, pray for wind.", ConsoleColor.DarkCyan);
            break;
        case 2:
            WriteLine("Light Breeze - Sucker wind.", ConsoleColor.DarkGreen);
            break;
        case 3:
            WriteLine("Breezy- Wake up and get ready.", ConsoleColor.Green);
            break;
        case 4:
            WriteLine("Windy- What the hell are you doing at the keyboard?", ConsoleColor.Yellow);
            break;
        case 5:
            WriteLine("Super Nuker- Get out and rig your Hankie.", ConsoleColor.Red);
            break;
        default:
            WriteLine("Roll the Dice - It's coming in waves.");
            break;
    }

    Console.WriteLine();
}
First, let's make sure the code works as a regular Console application. Open a Terminal in the project folder and do:
dotnet run
In Figure 1 I use the built-in Terminal in VS Code Terminal to test the 'application'.
Make it a Dotnet Tool
You now have a plain .NET Core Console application. To turn this into a Dotnet Tool add a few specific settings to the project file. At minimum add:
<Project Sdk="Microsoft.NET.Sdk">

  <PropertyGroup>
    <OutputType>Exe</OutputType>
    <TargetFramework>netcoreapp3.1</TargetFramework>
  </PropertyGroup>

  <!-- Dotnet Tool Specific settings -->
  <PropertyGroup>
    <PackAsTool>true</PackAsTool>
    <PackageId>dotnet-magicwindball</PackageId>
    <ToolCommandName>magicwindball</ToolCommandName>

    <PackageOutputPath>./nupkg</PackageOutputPath>
    <GeneratePackageOnBuild>true</GeneratePackageOnBuild>
  </PropertyGroup>

</Project>
The dotnet tool specific settings set the project as a .NET tool via <PackAsTool>, provide a name and set up the project to build as a NuGet package. With these flags in place you can now build the project and generate the Dotnet Tool NuGet Package into the ./nupkg folder:
dotnet build -c Release
If you use Visual Studio just build in Release mode.
This builds the project and creates a NuGet Package in the ./nupkg folder. You can use the NuGet Package Explorer to spy into the package to see what is in the package as shown in Figure 2.
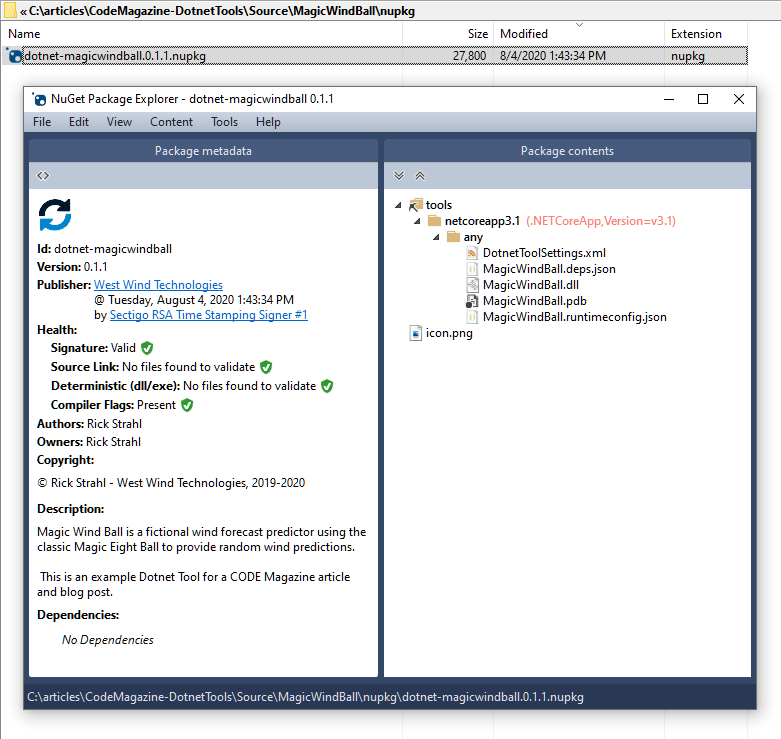
Figure 2 - The Dotnet Tool NuGet Package in the NuGet Package Explorer
Testing the Dotnet Tool Locally
Once you've created the NuGet Package you'll probably want to test it locally first before publishing it to NuGet (if at all). You can do that by installing the dotnet tool locally from a folder. To install a Dotnet Tool you use dotnet tool install or dotnet tool update.
For public tools that come from the default, cloud based NuGet package store you use:
Dotnet Tool install -g dotnet-magicwindball
But... this doesn't work yet, because I haven't published the package yet. You can however test the package locally by installing the NuGet component from a folder by specifying the --add-source ./nupkg command line option:
dotnet tool install -g dotnet-magicwindball --add-source ./nupkg
Et voila! You've just installed the Dotnet Tool locally and you can now run the tool simply by typing magicwindball into the Terminal. Figure 3 shows building, installing and running the tool in a Terminal window.
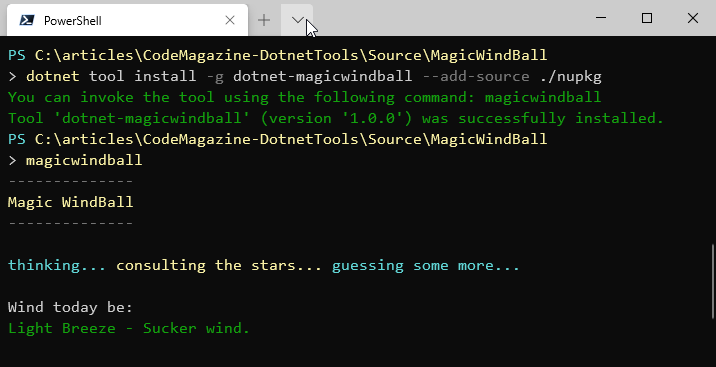 Figure 3 - Build and run your Dotnet Tool locally
Publishing to NuGet
Dotnet Tools are published as NuGet packages and use the same exact mechanism you might use to publish a NuGet package for a regular .NET Component using Nuget publish or you can also use the NuGet Package Explorer shown in Figure 2 earlier.
Here's a full build, sign and publish PowerShell script (full script on Github):
dotnet build -c Release

$filename = gci "./nupkg/*.nupkg" | `
                sort LastWriteTime | `
                select -last 1 | `
                select -ExpandProperty "Name"
$len = $filename.length

if ($len -gt 0) {
    nuget sign  ".\nupkg\$filename"   `
          -CertificateSubject "West Wind Technologies" `
          -timestamper " http://timestamp.comodoca.com"

    nuget push  ".\nupkg\$filename" -source nuget.org
}
Note that NuGet Package signing is optional, but since I already have a publisher certificate I'm using it to sign my package. For the nuget push to work you'll need to set the active NuGet publishing Id before you publish the package.
nuget setApiKey <your_API_key>
Once published the package is listed on NuGet after a few minutes. Figure 4 shows what the package looks like on the NuGet Package Store site.
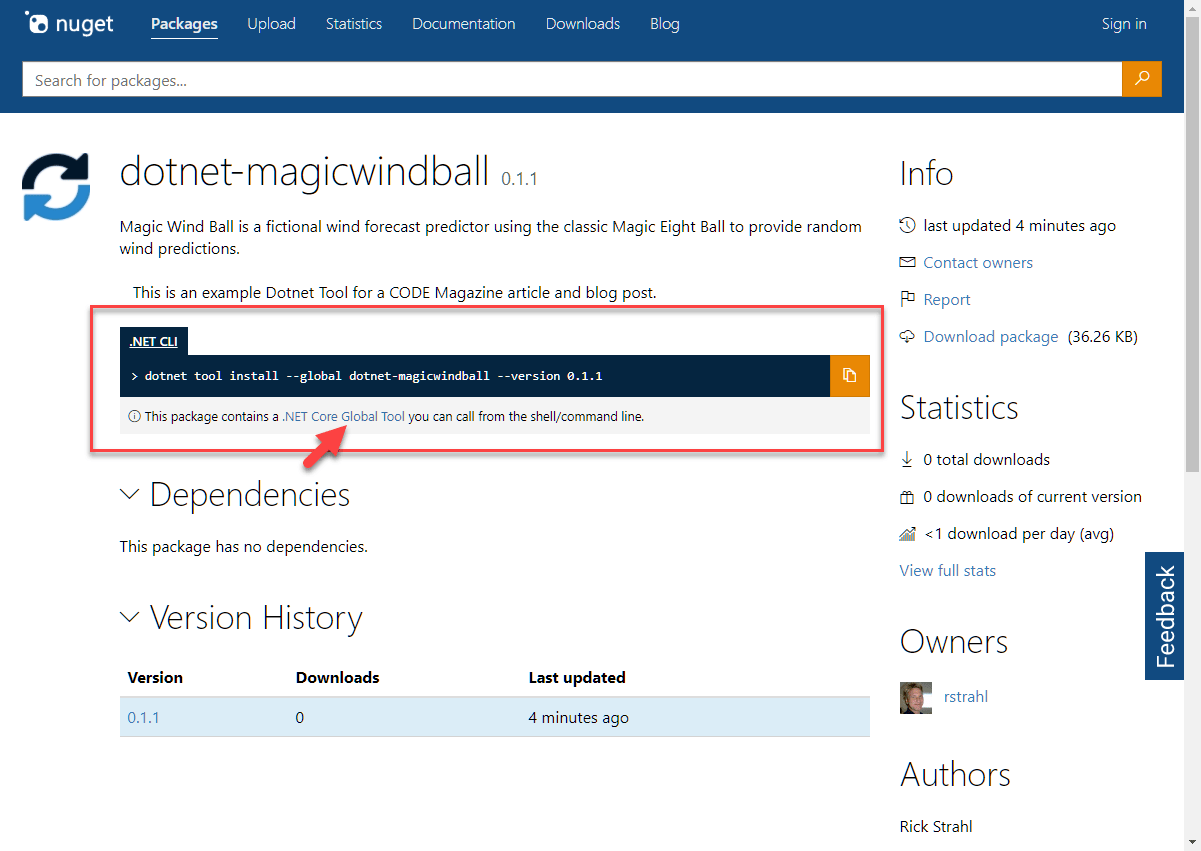
Figure 4 - The published Dotnet Tool in the NuGet Package Store
Once published, the package becomes accessible within a few minutes. Feed listings can take a bit longer, so you may have to explicitly specify a version on the command line using the --version flag.
You can now install and run the component from the NuGet Package Store. Figure 5 shows the install and run sequence.
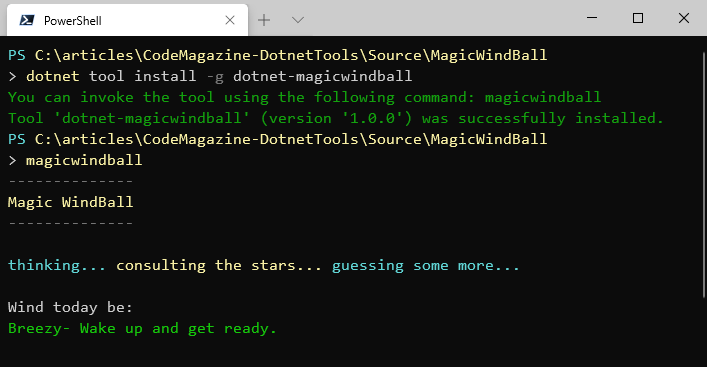 Figure 5 - Install and Run a Dotnet Tool
If you need to update the Dotnet Tool, make your code changes and increment the version number of the project then simply, re-publish to NuGet. A new package with the new version number is created and pushed and that becomes available on Nuget. Then use dotnet tool update -g dotnet-magicwindball to update the local tool installation.
How a Tool gets Executed
Dotnet Tools are deployed as .NET NuGet packages which don't include an OS specific executable file. Rather, when a tool is installed, a plaform specific, native launcher executable is generated that acts as a proxy loader for the .NET Core runtime, which then bootstraps the dotnet tool application. The launcher is created in a system mapped .dotnet folder and is then globally available using the <CommandName> specified by the project. Figure 6 shows the proxy and the actual install folder that holds only the .NET assemblies that can execute on any platform.
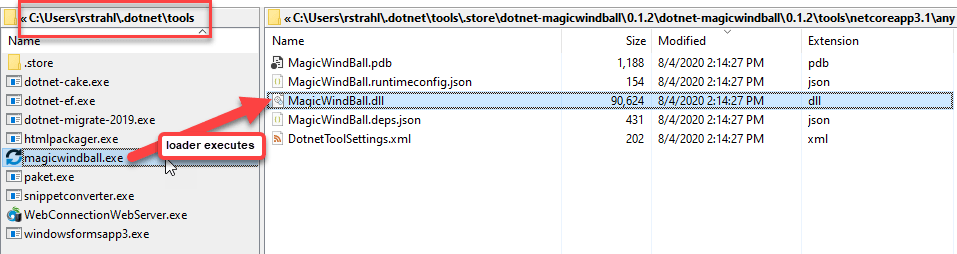
Figure 6 - An installed Dotnet Tool uses a proxy loader to launch the Dotnet Tool.
The .dotnet/.store path holds the actual unpacked NuGet package content for each tool installed. When you run the launcher stub (magicwindball.exe on Windows), the launcher starts, loads the .NET Core runtime and then calls the static void Main() entry point in the entry assembly of the package. The .exe you see on the left in Figure 6 is only a loader. If hook up an IL decompiler to the EXE you'll find that the exe is a native binary, not a .NET assembly.
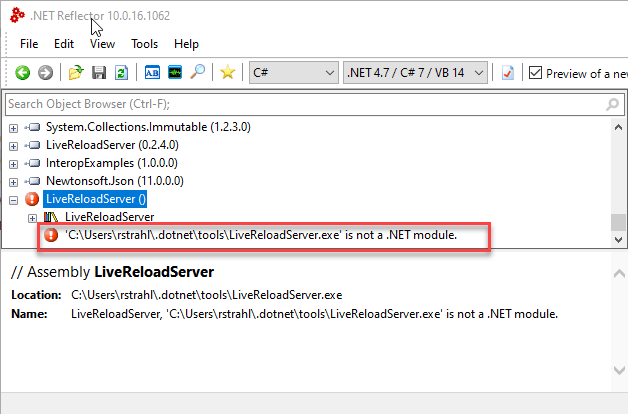
Figure 7 - The Dotnet Tool proxy executable is a native launcher
Running on another Platform: Linux with WSL
Dotnet Tools are platform agnostic and assuming your application doesn't use any platform specific features, they can run as is on Windows, Mac or Linux.
So let's run this Dotnet Tool on Linux using WSL using the same steps as before. Use dotnet tool install and then execute the command. Figure 8 shows what that looks like inside of the Windows Subsystem for Linux (WSL). If you have WSL installed on Windows or if you have another Linux or Mac OS available to test on, bring up a terminal there and follow the same procedure we used on Windows to install as shown in Figure 8.
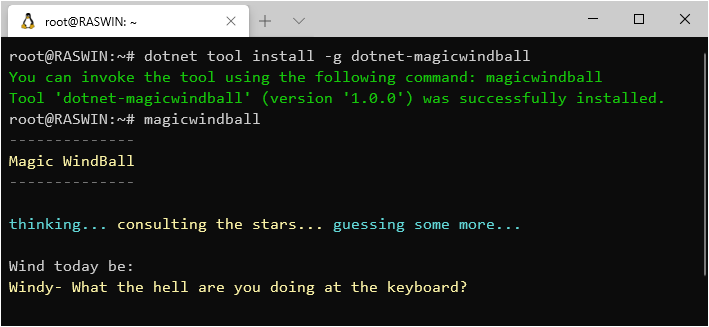
Figure 8 - Dotnet Tools are cross platform, here running under WSL
It works, and although this component is exceedingly simple, as long as your application doesn't do anything that is platform specific it'll work on the other supported platforms too.
Listing and Managing Installed Tools
You can check what tools you have installed by using the Dotnet Tool list -g command as shown in Figure 9.
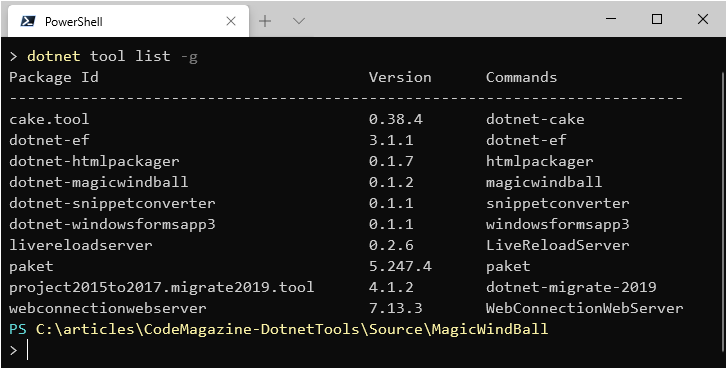
Figure 9 - Listing installed Dotnet Tool components
This lists both the Package Id which is the Install name used with NuGet and the Command name which is used to invoke the package. These can be different as they are for dotnet-magicwindball and the magicwindball command, but they don't have to be. The dotnet- is an original convention used by various .NET internal tools to make it obvious they are .NET tools, but I find in many cases it's more consistent to use a single value for the package and command.
Keep in mind that command names are case sensitive on case sensitive operating systems.
You can keep tools up to date using the update command:
Dotnet Tool update -g dotnet-magicwindball
and you can easily uninstall tools with uninstall:
Dotnet Tool uninstall -g dotnet-magicwindball
Example Components
In this section I'd like to describe a few of the Dotnet Tools I've created and discuss the how's and more pertinently the why's. I've been huge fan of these tools because it is so frictionless to get a tool published and reuse. If it wasn't for the easy of sharing via NuGet I probably wouldn't have bothered sharing these tools at all.
Some of these tools I built mainly for myself, but since I've made them public they ended up getting used by quite a few other people. Maybe you'll find some of these useful as well. But more importantly I hope it inspires you to share your own tools no matter how silly or simple - somebody might find them useful too!
Simple Tools
The first couple of examples are your typical utility tools that under normal circumstances I would have distributed as a downloadable installer or just a standalone binary. If a tool is popular enough I still go that route in addition to the Dotnet Tool, but for me personally I tend to use the .NET tool rather than a standalone installed application.
Visual Studio Snippet Converter
This tool is a narrow use case utility tool that converts Visual Studio Code Snippets (code expansions) into:
- Visual Studio Code Snippets
- JetBrains Rider Snippets
This is obviously specifically targeted at developers who are already using Visual Studio and so are very likely to have the .NET SDK installed just by virtue of using Visual Studio. So as a tool this is perfect and it fits perfect into the Dotnet Project Tooling use case that was the original design goal by Microsoft.
The background behind this tool is that I have a ton of Visual Studio code snippets that help me quickly format blocks of code - from inserting properties, creating entire blocks of classes that have complex signatures or inserting complex HTML markup completions for various Web frameworks. Snippets are an incredibly useful and very underutilized feature in Visual Studio (and other tools).
These days I use a number of different development tools - in addition to Visual Studio I use Rider for .NET development especially on other platforms and also Visual Studio Code especially for front end development.
So this tool lets me export my Visual Studio snippets into these other platforms and take advantage of them there as well. It also provides me a with a 'master' snippet repository which I keep in Visual Studio and then export after updating which makes it easy to keep snippets in sync.
To use this tool:
Dotnet Tool install -g snippetconverter
For options just run it:
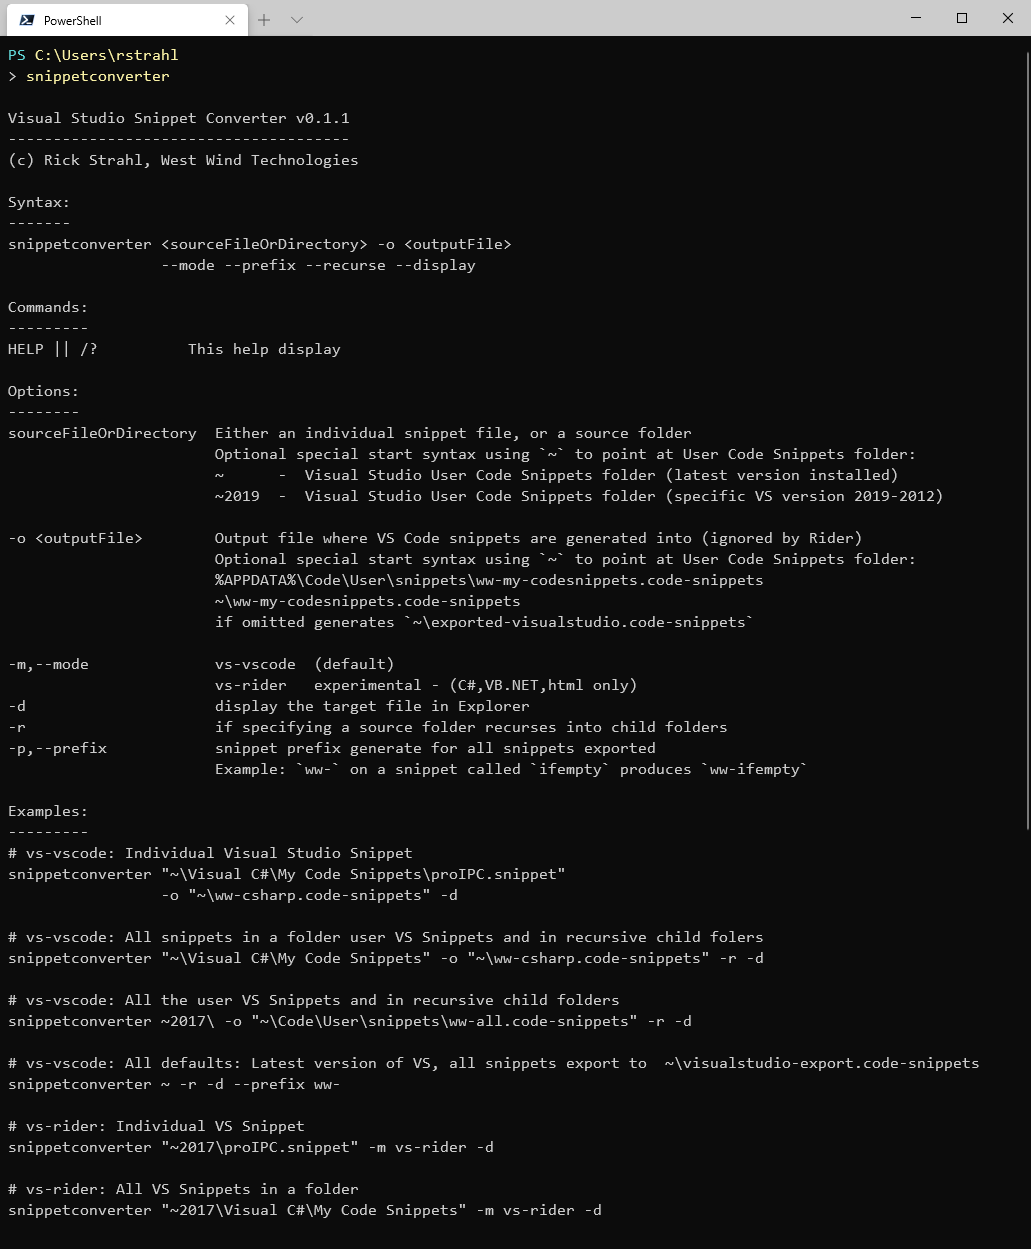
Figure 10 - A Snippet Converter tool to convert Visual Studio Snippets to VS Code and Rider
Then to run the converter you can specify a source snippet or folder and an output path:
snippetconverter "~\Visual C#\My Code Snippets" -o "~\ww-csharp.code-snippets" -r -d
To make the snippet location easier to use the tool lets you use ~ for the default snippet folders. For Visual Studio this points to the <Documents>\Visual Studio 2019 Code Snippets folder for example.
Figure 11 shows the source snippet folder and output generated by the Visual Studio code export:
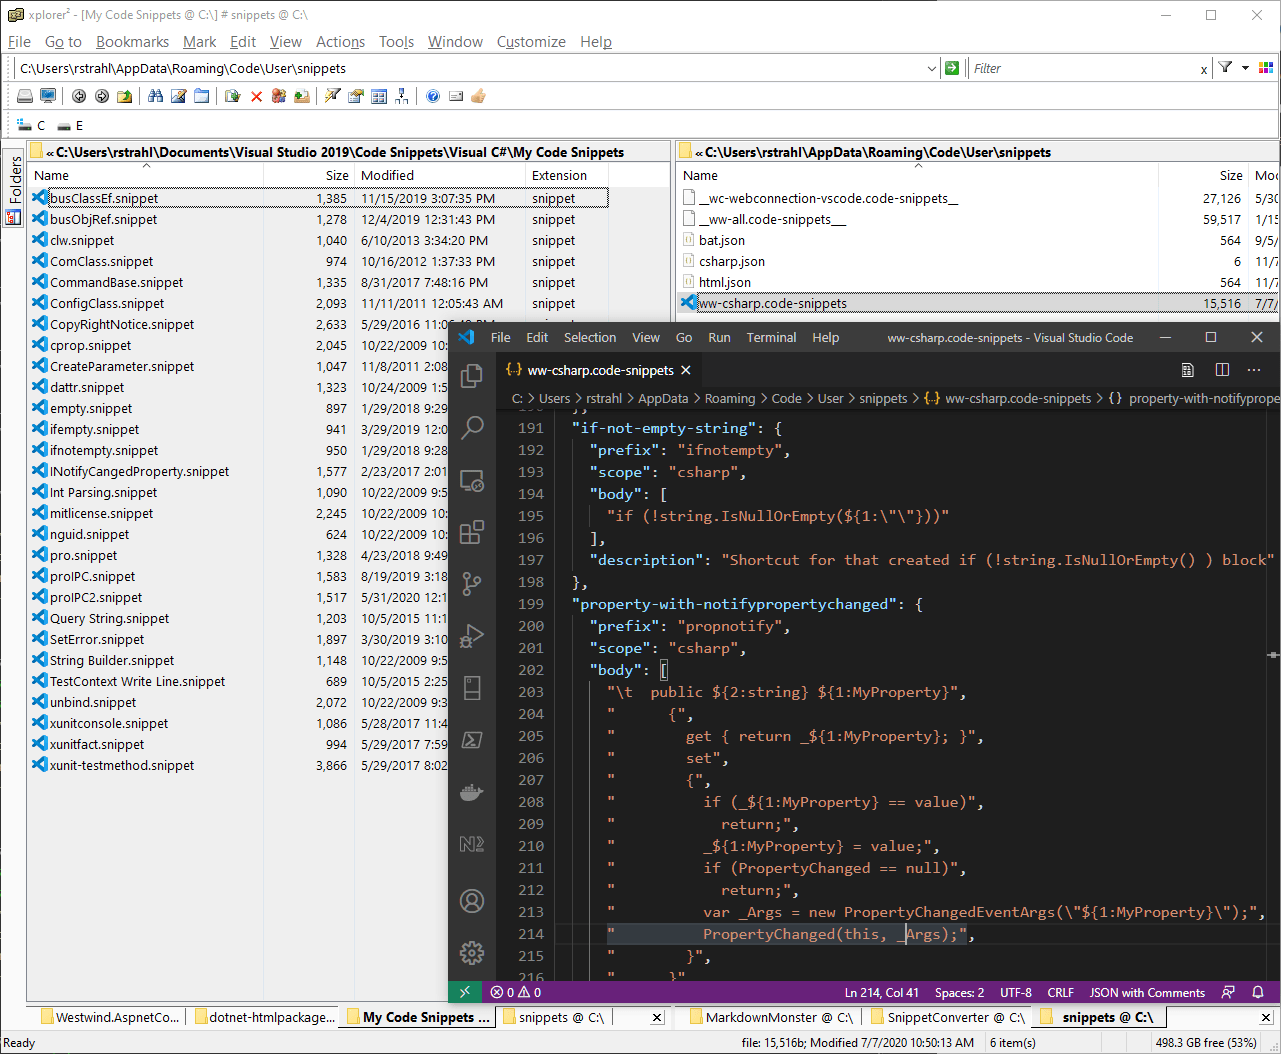
Figure 11 - Migrated snippets in VS Code
HtmlPackager
HtmlPackager is another very specific tool that I built some time ago to package up HTML content from a URL and package it into either a fully self-contained 'package' bringing all the content offline. The 'package' output can be either a single very large HTML file that internalizes all dependencies inline in the single HTML file, or an HTML document with a folder full of dependencies, or a Zip file of the latter HTML plus dependencies.
I needed this functionality at the time for my Markdown Monster editor, and was looking for a command line tool, but came up with nothing that worked that had a small footprint and no dependencies. As a result I ended up building my own .NET library that I used in Markdown Monster initially, but I also decided to provide it as a Dotnet Tool so it can be used from the command line to capture URL content into self-contained packages.
This tool is not directly related to Dotnet projects or the development process, but rather it's a general purpose tool and dotnet tool functionality just provides a very easy way to share this tool.
The dotnet-htmlpackager tool can be installed with:
Dotnet Tool install -g dotnet-htmlpackager
Once installed you can run using the help command to see command line options:
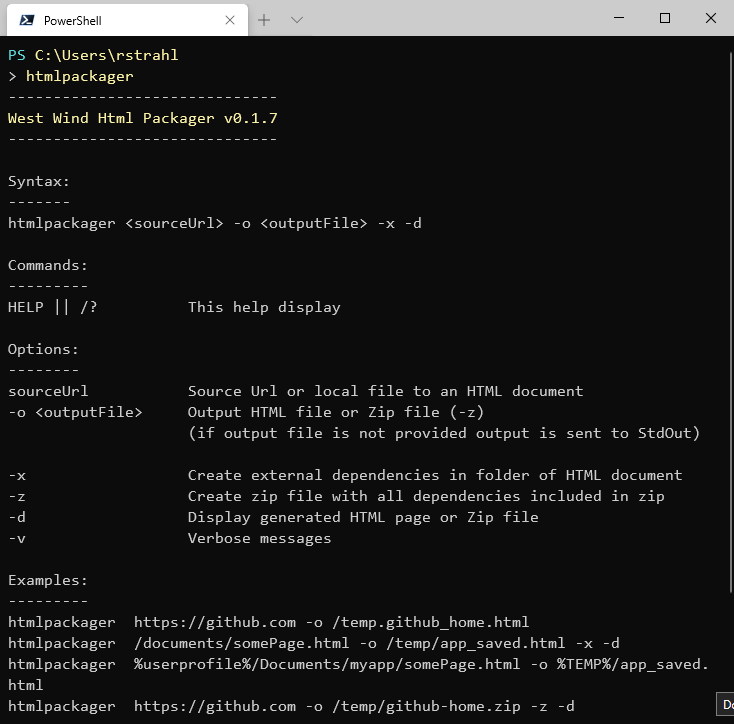 Figure 12 - HTML Packager packaging options
Then to run it you can do something like this:
htmlpackager https://markdownmonster.west-wind.com -o /temp/captured/MarkdownMonster.html -v
which creates a single, very large but fully self-contained HTML file:
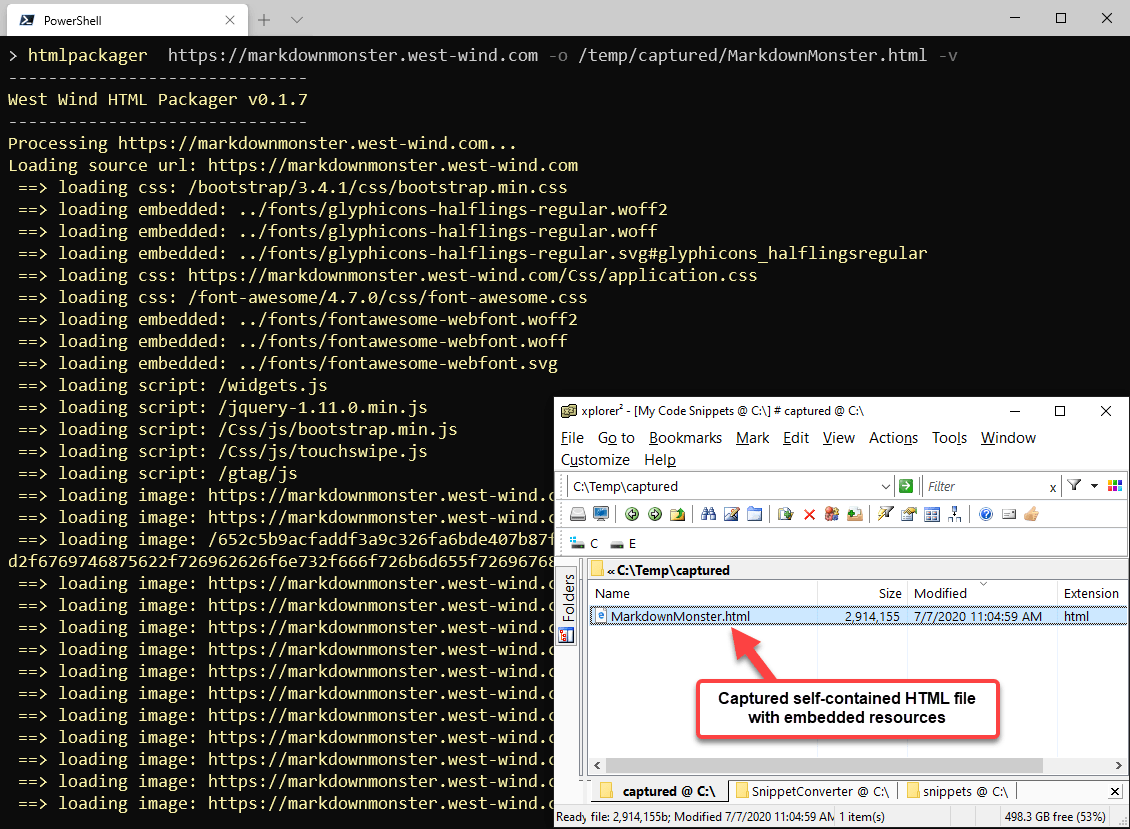
Figure 13 - Running HTML Packager against a URL produces a single self-contained HTML file
There are other options for creating:
- A folder of loose HTML and resource files
- A zip file of the folder of loose HTML and resources
It's a very special use tool but I've found this to be very useful in a few scenarios where I needed to automate the process of capturing an HTML page.
Because this tool is very general purpose, it's also published via Chocolatey as a standalone tool:
choco install htmlpackager
Servers
Because a .NET tool is just a .NET Core application you can take advantage of just about any .NET Core feature - including the ability to create self-contained Web server applications and services that can run locally.
LiveReloadServer - A Generic Static File Web Server
I frequently run local static Web sites on my dev machine where I need to access some client side development site or if I need to do some quick fixes to some HTML or client side content and just push it back up to a server.
In order to do this efficiently I can spin up a full development environment or I can just quickly run a local development server and run the application. The LiveReloadServer tool I created is just that - a quick and dirty .NET Core based static Web Server that can serve local static file content out of an arbitrary folder you specify. It can:
- Serve Local Static Web Content
- Loose Razor Pages (optionally)
- Markdown Pages
In addition it also provides what for me is the most useful feature:
- Live Reload Functionality (optionally)
The live reload functionality is built-in and enabled by default and automatically refreshes any active HTML pages loaded through the server when an HTML page or any other related resources like CSS, JS etc. plus any extensions you've added are changed. This makes it a great tool to use on older non-build process Web sites or tools you might need to run locally to add functionality and make changes.
The Dotnet Tool makes it easy to install the server and it's very quick to run and start up.
This is not a new idea obviously. There have been static NodeJs based servers like http-server or browser-sync forever, but these tools require NodeJs and - for browser-sync at least - it doesn't work as quickly or nicely as I would like. LiveReloadServer is an alternative and it's .NET Core based.
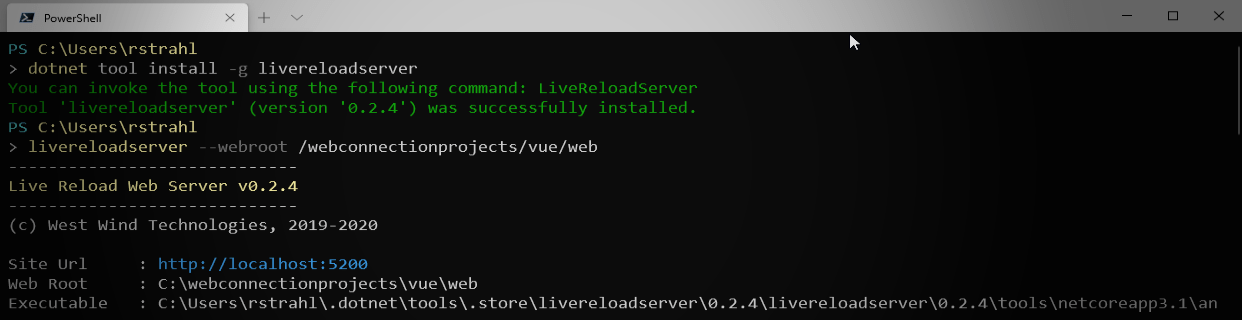
To use Live Reload Server:
Dotnet Tool install -g LiveReloadServer
To run it you simply point it at a --WebRoot folder on your local machine and that site then becomes a Web Site
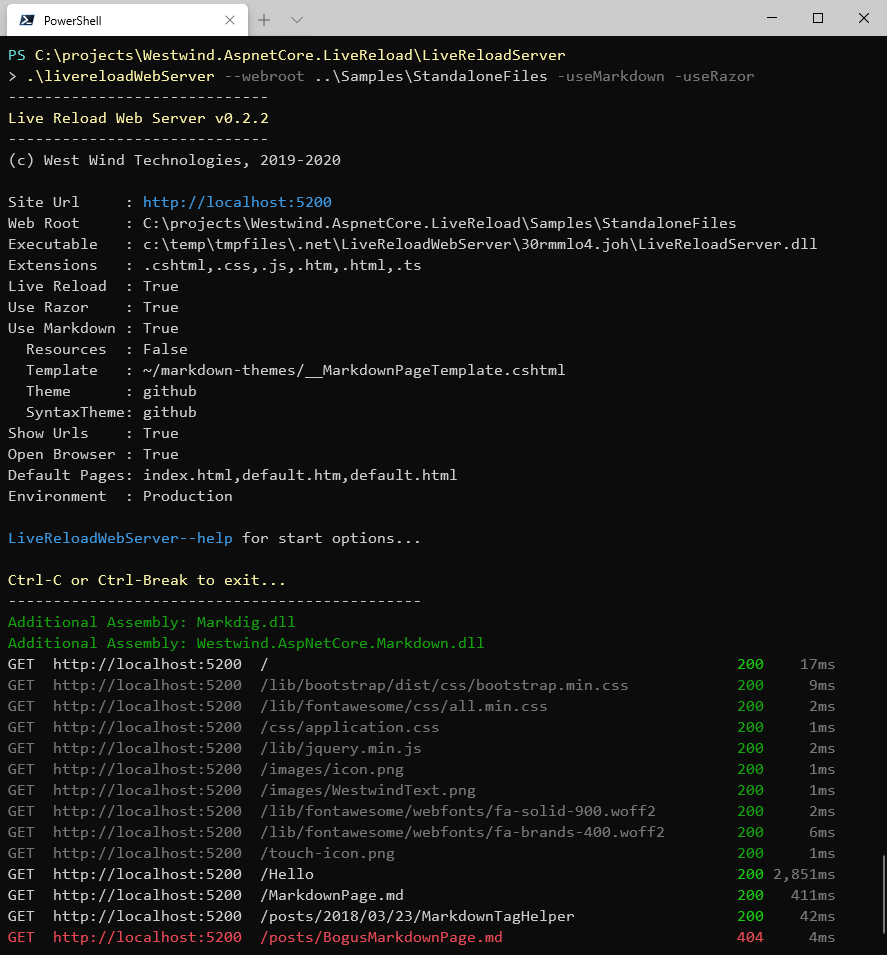
Figure 14 - LiveReloadServer generically serving Web content out of a local folder
Live Reload is enabled by default so you can edit static text files and if you have Razor Pages and/or Markdown Page processing enabled you can also edit Razor and Markdown pages and see those pages refreshed.
This is very useful Dotnet Tool and I use it almost daily. It's also useful to have easy access to when you need to quickly launch a local Web server to check out a folder of files. It also works cross platform, so although originally I built this mainly for my local Windows setup it turns out it also works great on a Mac and Linux (with some minor adjustments for file path syntax 😁).
The server can run both in local publishing mode but can also be accessed externally.
A Legacy Web and Application Server
The final example is for a legacy application server. It's an ancient tool that has recently been updated to .NET Core as an option. I've been involved with - wait for it - a FoxPro legacy product called West Wind Web Connection that I maintain and still have a hundreds of users on - for nearly 25 years now. This is ultra legacy, and you may laugh at technology this old.
But because the tools I created so many years ago extended FoxPro functionality to build Web applications, there are still a fair number of existing applications that use large FoxPro code bases that haven't been touched in forever and just keep going. These tools have been kept current and continue to allow these ancient applications to continue ticking along without major disruption or requiring complete re-writes on other platforms for which there often is no budget or technical incentive.
West Wind Web Connection has for many years used .NET technologies to provide the interface between a Web Server (IIS in the past) and FoxPro and the tech using .NET (and now .NET Core) and COM (ugh) is surprisingly stable and reliable with a number of updated applications running on the platform that are nearly 25 years old.
So, when .NET Core came out a few years ago, it offered a number of new opportunities to extend the Web Server interface tooling West Wind Web Connection implements by:
- Providing a fully self-contained development server
- Providing a nearly zero configuration environment
- Ability to run the server component on non-Windows machines
- Ability to run a local machine or network server without requiring IIS
- Ability to run truly local Web application like Desktop applications
Long story short - a Dotnet Tool turned out to be great delivery mechanism for someone who needs to run an old application that was built with West Wind Web Connection, but doesn't have access or can't install IIS on a machine and most of all doesn't want to set up and configure IIS.
This sounds weird, but this is actually a very common scenario for me: A user calls and says they have a West Wind Web Connection application that was developed 15 years ago, the developer left and they need to run the application and perhaps make a few changes. Setting up an environment in the past was not the easiest thing in the world. With this new component I can whittle that down to:
- Install the .NET Core SDK
- Install
Dotnet Tool install -g WebConnection - Point at a West Wind Web Connection folder and go
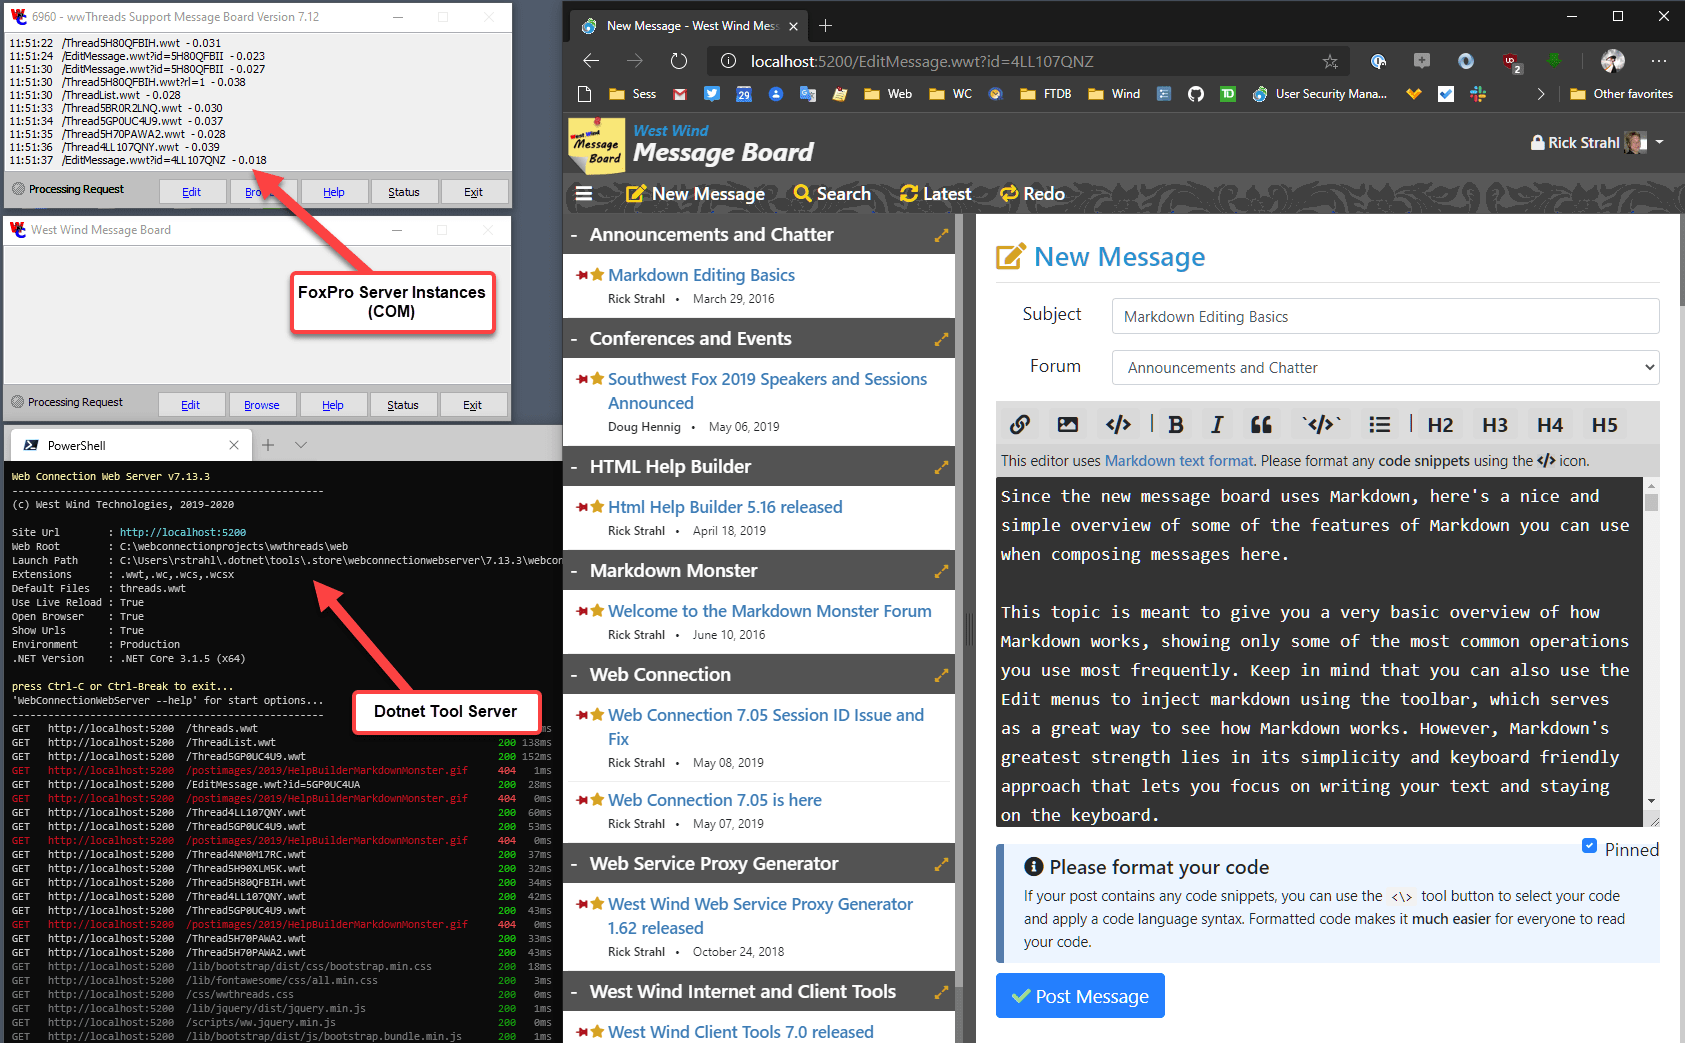
Figure 15 - WebConnectionWebServer running a FoxPro server application through .NET Core
A Dotnet Tool here offers a smooth solution to distribute a server that can then be used to serve an ancient legacy application without complex configuration or special installations required. On the local machine it's literally - point at a West Wind Web Connection application folder and go - no further configuration required. The same server implementation can also be deployed in a live environment with IIS.
The internal server implementation is very similar to the Live Reload server, but extended to handle the West Wind Web Connection server protocols so it can handle West Wind Web Connection specific script handling and request routing that lets FoxPro server code execute in response to Web requests. The .NET Core implementation was moved from a .NET HTTP Handler to .NET Core Middleware, and it was surprisingly easy with 95% code reuse from the existing handler. The most complex changes for .NET Core had to deal with introducing the Async cascade required to handle all the HTTP inputs and outputs using async code.
Legacy technology is always an eye roller, and I doubt any of you will use this technology (or even know what it is) 😄, but it makes for an interesting use case of the Dotnet Tool functionality in a very unconventional scenario.
Summary
Dotnet Tools provide a great way to share executable code from .NET Core in an easy and platform independent way. If you've built a NuGet package and published it before you already know how to build and share a Dotnet Tool.
They are easy to consume which gives access to a variety existing tools and because they are so easy to share promote a community of tools to be created.
Hopefully this post has given you some ideas of tools that you might want to use, or better yet - create and share your own with the community or even just within your organization.
Rock on!
Resources
Dotnet Tool Projects
 this post created and published with the
Markdown Monster Editor
this post created and published with the
Markdown Monster Editor
Other Posts you might also like
- Adding minimal OWIN Identity Authentication to an Existing ASP.NET MVC Application
- Resolving Paths To Server Relative Paths in .NET Code
- Getting the Client IP Address in ASP.NET Core
- Map Physical Paths with an HttpContext.MapPath() Extension Method in ASP.NET
- Back to Basics: Rewriting a URL in ASP.NET Core
The Voices of Reason
# re: Using .NET Core Tools to Create Reusable and Shareable Tools & Apps
@Lex - yes I think you're right on that. .NET Core doesn't automatically roll forward to a higher runtime version, if you need to run both versions then you need to multi-target. Not sure if that's really necessary though - I would think you'd always want to target the latest version and keep moving the application forward as the SDKs rev up so a current install can run on the latest SDK.
# re: Using .NET Core Tools to Create Reusable and Shareable Tools & Apps
Great article!!!
You are correct on the search, but we are finally able to fix it in .NET 5.0!!!! Look for dotnet tool search <searchString> in the Preview or final release 😃
We suggest that you target as low as possible, and if you don't think you'll do anything risky, have it roll forward forever! Shall I look up the project file syntax for that? Here's a work item that covers the details and has a link to the spec.
I think it's simpler to prefix your package ID with your own brand, or with no brand. I don't think the dotnet is helpful here, but it does show that they don't need to match. The Package ID must be unique on NuGet. The commandName must be unique on the box.
You covered just about
About the only thing you didn't cover is that there are 3 installation methods people can use. Global is great when a single version works across your machine. Local is designed for simplifying repo setup and for specifying tool version per repo. Tool-path is when you want to put it in a specific place, rather than calling from the global location. This is good for CI, for example. Microsoft docs has a great article.
Thanks again for the super great article! And wishing you much wind!
(I'm the PM for .NET (Global/Core) Tools)
# re: Using .NET Core Tools to Create Reusable and Shareable Tools & Apps
@Kathleen - thanks for the extra information. I was focusing on the global tool aspect so didn't spend much time on this already long article talking about local install or CI specific builds. Probably should add a note to that effect at least.
Love these tools - been a big help in using some stuff, especially the LiveReloadServer I mention in the examples which I use all the time as a dotnet tool.
# re: Using .NET Core Tools to Create Reusable and Shareable Tools & Apps
Great post Rick. Searching for .NET tools is now available on NuGet https://devblogs.microsoft.com/nuget/advanced-search-on-nuget-org/
# re: Using .NET Core Tools to Create Reusable and Shareable Tools & Apps
@Marcus - Maybe the Nuget team just needed a kick in the ass with a post like this??? 😃
# re: Using .NET Core Tools to Create Reusable and Shareable Tools & Apps
Looks like the ToolGet site has been given up and the domain now has malicious content and therefore should be removed from your article. Great write up though!
# re: Using .NET Core Tools to Create Reusable and Shareable Tools & Apps
Again, the best article I read on this topic. But maybe one thing is not expanded. The .NET Core tool example used here binds to .NET Core 3.1, so though it is not a platform dependent executable, .NET Core 3.1 runtime is required as prerequisite.
I owned such a tool that requires .NET Core 2.1 runtime. When a user only has .NET Core 3.1 SDK, and no 2.1 runtime, then after installing that .NET Core tool isn't able to run. So I assume the .NET Core tool project must use multi targeting, but I didn't have time to test that out.