
Authenticator based Two Factor Authentication (2FA) using an external app like Authy, Google or Microsoft Authenticator or one of the Two Factor Authentication (2FA) enabled password managers like 1Password are becoming more common in Web applications. Unlike using Email or SMS for the second piece of validation in 2FA, Authenticator apps don't require you give up another piece of private information or use an external service to verify an existing account.
Two Factor Authentication is an additional bit of security that you can use on top of an existing authentication system to provide extra security, that can't be easily discovered or stolen as it uses one-time keys. As such you still need a primary authentication provider to verify the user first, and you can use 2FA to provide additional security or provide a way to recover an account in case the passwords is lost.
In this post I'll describe how to to implement Authenticator based verification outside of the context of ASP.NET Identity, so you can add this to just about any solution. I'll describe my integration in my own Web Store, so it's somewhat app specific, but the examples I provide are generic enough that you can easily modify them to fit into your particular application scenario.
For reference, here is the implementation I'm going to be discussing:

Figure 1 - The entire workflow of two Factor Authentication with an Authenticator App (1Password)
Two-Factor Authenticators
This post is specific to 2FA with an Authenticator app, but there are other ways to implement 2FA including a second email address, SMS messages or phone callbacks.
I prefer Authenticator apps because - outside of the free Authenticator app requirement - they are a fully self-contained solution: you don't need an external service to verify a validation. Other 2FA mechanisms like SMS and phone callbacks require you to use a paid for service to initiate the request, or yet another piece of private information you have to hand over in the case of a second email address or SMS phone number.
The downside is that Authenticators are still somewhat unconventional for the average computer user, and the process of using them isn't exactly obvious. If you haven't used an Authenticator app before, you have to install one first, which can also be annoying to new users. Once installed though, you can use any Authenticator app with any site, so installation is a one time thing.

There are many Authenticator apps available. Here are a few popular ones:
These apps are interchangeable and you can use any of them to set up accounts/site.
To give you an idea, here's what Authy looks like on a phone:
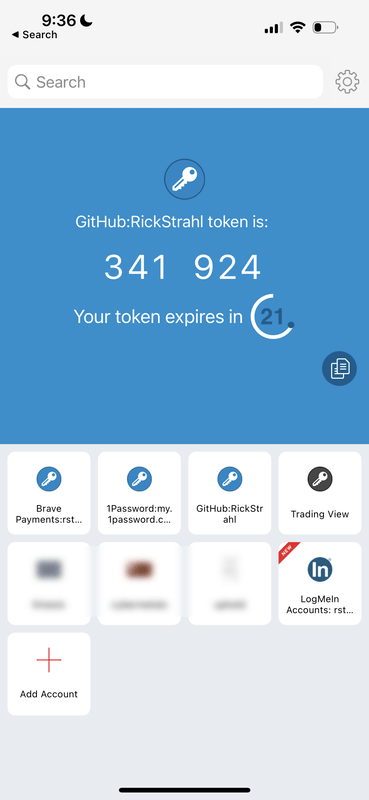
Figure Figure 2 - An Authenticator app - Authy - running on a phone
Authenticators tend to have a list of configured 'accounts' that you choose from, and a detail screen that generates a new validation code that is valid only for a short interval and updates after the interval is up. You can copy this code to the clipboard and then paste it into the application requiring Two Factor Validation code.
To set up a new account or site, you either scan a QR code or you can provide manual entry via a text based code. Again here's Authy's capture screen:
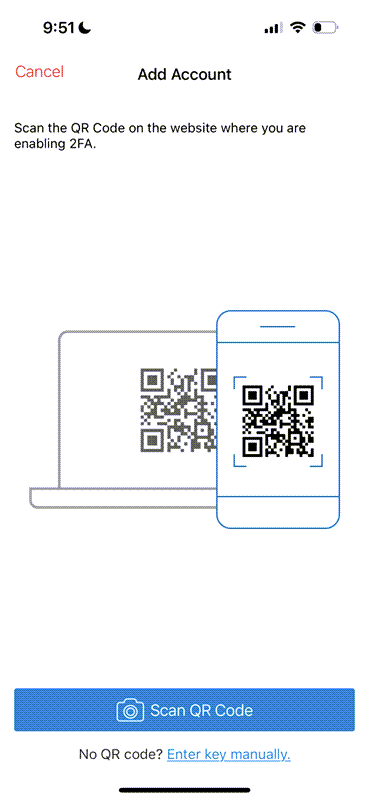
Figure 3 - Capturing a QR code or manually entering a Setup key.
If you click the Scan button it then brings up a camera view that lets you point at a QR code. Alternately you can manually type in the Setup code.
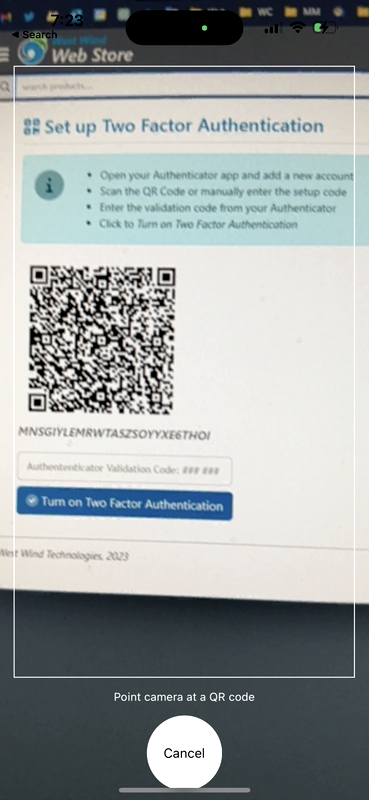
Figure 4 - QR Code capture with a phone camera
This is on a phone, so you can use the camera to scan the QR code. If you're setting up on a desktop you can either use a text based Setup code, or if the tool has browser integration it sometimes can pick up a QR code off the current Web page (1Password does this).
Some password managers also have 2FA integration. I use 1Password and it has integrated 2FA. This offers a seamless workflow that can autofill, username/password and 2FA auth code all in one quick automated pass. You can see that in use in the screen capture at the beginning of the post.
Alternately you can also do this manually. Here's 1Password once configured with 2FA auth:
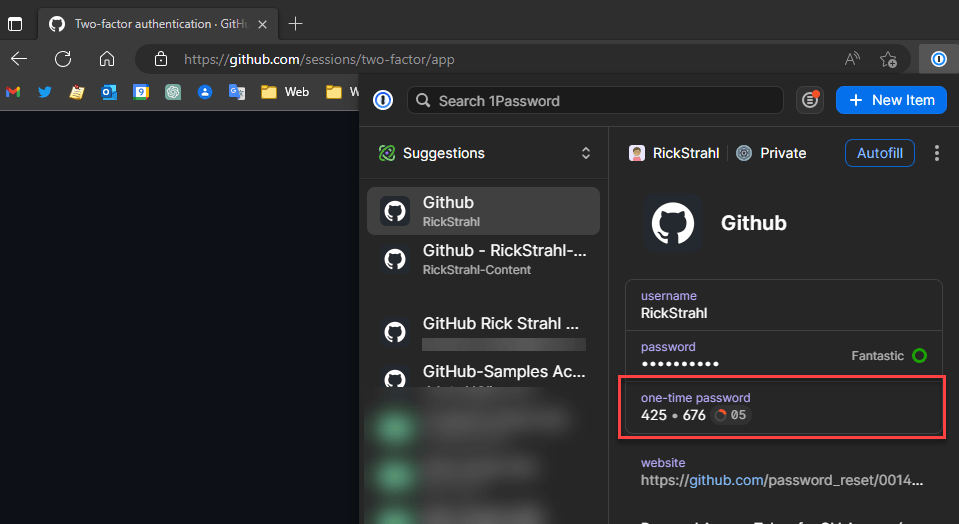
Figure 5 - Password manager integration lets you keep passwords and 2FA codes in one place
You can copy the code (if set up to manually fill) or you can set up the 1Password to autofill, which completely automates the GitHub username/password and 2FA login which is pretty sweet.
Single Source Two Factor Security?
Some people commented that integrated 2FA in your password manager makes 2FA less secure.
While that's true to some extent, the important thing is that 2FA works not so much because of separate devices, but rather that you are validating two independent pieces of information.
While email and passwords can be hacked at the host site, Authenticator security comes from the fact that it's a second, very short lived, one-time piece of information that can only be compromised by physically gaining access to an unlocked device, or by compromising the key store provider. If the key store is corrupted an attacker still would have to correlate the keys to a Web site and a username and password combo. Not impossible (social engineering or gun to your head), but as far as the real world goes - pretty unlikely.
Implementation
I'm going to be talking about this topic in the context of an actual application, so the code presented here is not meant to be cookie cutter, of the 'just plug it in' type. Rather it's intended to show you what you need to know and how it all fits together in the context of a real application. The bits and pieces are pretty small and can be easily adapted for integration into your own solutions. I do provide most of the code in small snippets and also with links to the implementation in the Web Store on GitHub if you want to look at it in the full context of an application.
To give some context, in my Web Store application I'm using:
- Custom Username Password Authentication (not using Identity)
- 2FA Authenticator authenticate

My use case at the outset was as follows:
- I have an existing Username/password Auth implementation (not using ASP.NET Identity)
- I'm adding Adding Two-Factor Auth as an optional Add-on
First things First - you need Primary Authentication
2FA is not a standalone authentication technology. Rather it's an additional feature that can be used to make an existing authentication scheme more secure.
In the Web Store application shown in the screen capture I use Username/Password authentication, which also doesn't use ASP.NET Identity, but it does rely on ASP.NET's core authentication semantics to handle Cookie authentication. I've written about how this works in a previous post if you're interested.
Overview
There are quite a few moving pieces so before starting out let's review what tools and steps are needed for the integration:
Key Setup
- Install the NuGet Package for
GoogleAuthenticator
- Implement a Setup Page that displays a barcode and manual key
- Generate a per user unique key
- Create a new account in your Authenticator
- Verify the new Account with a Validation Code
- Save that unique user key with a user record for later use in validation
Key Validation after Login
- Implement a post login validation code verification page
- Once validated apply to user tracking authentication
The GoogleAuthenticator Library
The first thing we need is to use the GoogleAuthenticator NuGet package to provide the key generation and validation logic needed to create a setup key, display a QR code and text key, and then also verify Authenticator generated validation keys.
The GoogleAuthenticator library by Brandon Potter is easy to use and provides the basic features you need in a couple of easy to use static methods that require only a few lines of code. This library solves all of the technical semantics of dealing with 2FA. The rest is related to application and UI integration. Contrary to its name this library can be used with any authenticator including Microsoft Authenticator, Authy and as shown above using 1Password and other Password managers that have support for 2FA.
To install the package use the Package Manager in your IDE or from the command line:
dotnet add package GoogleAuthenticator
We'll use this library for two tasks:
- Creating a Setup key and QRCode
- Validating the user entered validation code
Creating the Setup key and QR Code
The first thing is to create the 2FA Setup page which should look something like this:
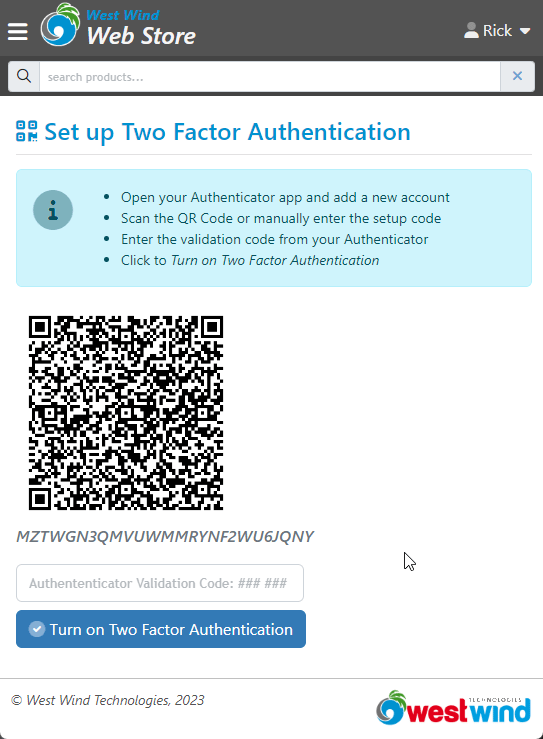
Figure 6 - Setup form for 2FA authentication: QR Code, Manual key and initial validation form
The three key pieces on the page are:
The QR code
The QR code can be scanned or read by Authenticator apps to simplify setup of an account/site to provide keys for. The QR code represents a setup code that uniquely identifies this resource.
Manual Setup Code
If your Authenticator or device doesn't support scanning a QR code you can also enter the code manually using the text based code.
Validation Form
Once the Authenticator app has the account set up, it can generate a validation code which you then need to use to to actually associate the account with your application's security implementation. You need to validate first to ensure that the account is set up and working before you associate it with your app's security. At this point the application needs to save the unique secret key that identifies this Authenticator account.
Behind the scenes a few additional things need to happen:
Setup Code Generation
We can use the GoogleAuthenticator library to generate a new setup code.
Capture and Save a Unique User Key
In order to link a user and account you have to generate a unique id specific to the user and save it so it can be used for validation.
The bare bones code to generate a new setup key to create a QR and text code with GoogleAuthenticator, and then save the unique user key looks like this:
var twoFactor = new TwoFactorAuthenticator();

// We need a unique PER USER key to identify this Setup
// must be saved: you need this value later to verify a validation code
var customerSecretKey = Guid.NewGuid.ToString();

var setupInfo = twoFactor.GenerateSetupCode(
    // name of the application - the name shown in the Authenticator
    wsApp.Configuration.ApplicationName,
    // an account identifier - shouldn't have spaces
    customer.Email,
    // the secret key that also is used to validate later
    customerSecretKey,
    // Base32 Encoding (odd this was left in)
    false,
    // resolution for the QR Code - larger number means bigger image
    10);

// a string key
model.TwoFactorSetupKey = setupInfo.ManualEntryKey;

// a base64 formatted string that can be directly assigned to an img src
model.QrCodeImageData = setupInfo.QrCodeSetupImageUrl;

// Store the key with the user/customer (app sepecific)
customer.TwoFactorKey = customerSecretKey;
customerBus.Save();
The GenerateSetupCode() method from GoogleAuthenticator does most of the work in this and it returns a structure that contains both the QRCode as an image-ready base64 string, and the manual entry code that can be displayed as text. Both are bound to the Razor page via the model I'll discuss in a minute.
Because the image data is returned in in base64 image-ready format (ie. data:image/png;base64,base64Data), the QR code image data can be directly assigned to a plain <img> tag:
<img src="@Model.QrCodeImageData" />
The above code is simplified and lacks the logic to verify before creating key etc. I'm running actual code that includes the above bits in an MVC controller which:
- Checks that the user is logged in with username/password
- Loads the user/customer
- Checks whether 2FA is enabled for the user
- Creates the Setup code and displays it
- Validates that the account is set up by verifying a validation code
Here's the Razor View for the Setup page:
@model SetupTwoFactorViewModel

<div class="container" style="max-width: 800px">
    <h1 class="page-header-text">
        <i class="far fa-qrcode"></i>
        Set up Two Factor Authentication
    </h1>

    <div class="alert alert-info">...</div>

    <error-display error-display-model="Model.ErrorDisplay" ></error-display>

    <div class="mt-3">
        <img src="@Model.QrCodeImageData"
             style="width: 100%; max-width: 220px"
             title="Scan this QR Code with your Authenticator app"/>

        <div title="Manual entry code to use instead of QR code"
             class="text-secondary">
            @Model.TwoFactorSetupKey
        </div>
    </div>

    <div class="mt-3">
        <form action="" method="POST">
            <input class="form-control" asp-for="ValidationKey"  />
            <button name="btnValidate" class="btn btn-primary mt-2">
                <i class="fad fa-check-circle"></i>
                Turn on Two Factor Authentication
            </button>

            <!-- we need to keep track of the CustomerSecret key so we don't
                 regenerate a new key for each request                   -->
            <input type="hidden" asp-for="CustomerSecretKey" />
        </form>
    </div>
</div>
full code on GitHub
The middle section displays the QR code and manual key as read only values. The form on the bottom captures the validation code you need to verify using your Authenticator app. Additionally the CustomerSecretKey hidden form value is used to persist the new unique user key that we eventually need to save with the user to validate subsequent requests.
The workflow of this page is:
On Get
- Display the QR code and Manual Code
- Initialize the CustomerSecret key
- Allow removal of a 2FA Setup ('remove' task parameter)
On Post
- Verify a valid Authenticator App code
- Save the unique user key with the user data
Note: This page is only accessible once you are already authenticated by the primary authentication, so this dialog is only accessible after you are already logged in both for adding and removing 2FA.
This code includes a number of my framework helpers that are app specific, so use this code as a guideline not as is. You'll need to handle the user mapping logic to map to whatever your user or customer record that holds your login and validation key data.
[Route("/account/setuptwofactor")]
[HttpGet,HttpPost]
public IActionResult SetupTwoFactor(string task, SetupTwoFactorViewModel model)
{
    task = task ?? string.Empty;

    if (model == null)
        model = CreateViewModel<SetupTwoFactorViewModel>();
    else
        InitializeViewModel(model);

    if (!AppUserState.IsAuthenticated())
        return RedirectToAction("Profile", "Account");

    // App Specific user lookup
    var customerBus = BusinessFactory.GetCustomerBusiness();
    var customer = customerBus.Load(AppUserState.UserId);
    if (customer == null)
        return RedirectToAction("Profile", "Account");

    // REMOVE operation
    if (task.Equals("remove", StringComparison.InvariantCultureIgnoreCase))
    {
        customer.TwoFactorKey = null;
        customerBus.Save();
        return RedirectToAction("Profile", "Account");
    }

    if (!string.IsNullOrEmpty(customer.TwoFactorKey))
        return RedirectToAction("Profile", "Account");

    // Create or use generated Unique Id
    if(string.IsNullOrEmpty(model.CustomerSecretKey))
        model.CustomerSecretKey = Guid.NewGuid().ToString();

    var twoFactor = new TwoFactorAuthenticator();
    var setupInfo = twoFactor.GenerateSetupCode(
        wsApp.Configuration.ApplicationName,
        customer.Email,
        model.CustomerSecretKey,
        false, 10);

    model.TwoFactorSetupKey = setupInfo.ManualEntryKey;
    model.QrCodeImageData = setupInfo.QrCodeSetupImageUrl;

    // Explicitly validate before saving
    if (Request.IsFormVar("btnValidate") && !string.IsNullOrEmpty(model.ValidationKey))
    {
        if (twoFactor.ValidateTwoFactorPIN(model.CustomerSecretKey, model.ValidationKey))
        {
            customer.TwoFactorKey = model.CustomerSecretKey;
            if (customerBus.Save())
            {
                return RedirectToAction("Profile", "Account");
            }

            ErrorDisplay.ShowError("Unable to set up Two Factor Authentication");
        }
        else
            ErrorDisplay.ShowError("Invalid Validation code.");
    }

    return View(model);
}
full code on GitHub
This controller method handles a few operations:
- Initial Display (GET)
- Removing of a 2FA Setup (GET)
- Validating Authenticator Setup (POST)
The QR Code creation code is the same as described above. Note that I'm generating a new unique ID for the TwoFactorSetupKey which is used to create the the Setup code. The value is stored and passed through via the model, so the code doesn't change when we submit the validation code.
Only once the validation is completed successfully do I write the TwoFactorSetupKey to the user account and save it, which enables the account for 2FA.
The code also includes a removal operation via ?task=remove query string. In this application 2FA is optional and user determined so clearing the key is all I need to no longer check 2FA. The key can only be removed of course when the user is fully signed in, including Two Factor Auth.
At this point our 2FA is set up for the application.
Validating a 2FA Authenticator Key
If 2FA is enabled the user has to first log in with username and password, and is then redirected to the additional Two Factor Validation form.
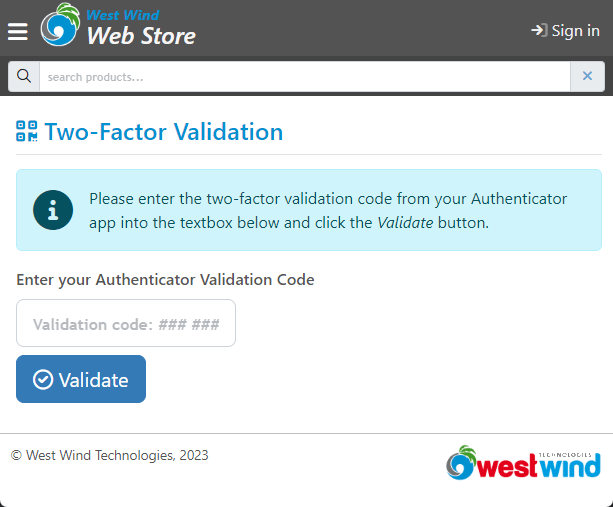
Figure 7 - Form to verify a validation code
The user then has to use the Authenticator app to generate a validation key, either types it in or auto-fills it. The application then validates the key. For validation, GoogleAuthenticator makes it very easy to verify a validation key:
var twoFactor = new TwoFactorAuthenticator();
bool isValid = twoFactor.ValidateTwoFactorPIN(customer.TwoFactorKey,
                                              model.ValidationCode.Replace(" ",""));
The VarlidateToFactorPIN() method takes two parameters:
- The unique customer key you created during 2FA setup (stored in user data)
- The validation code from the Authenticator entered into the form
Note that the Validation code has to be stripped of all spaces, so make sure to use .Replace(" ","").
Here's the (simplified) layout for the validation form:
@model TwoFactorValidationViewModel

<div class="container" style="max-width: 640px">
    <h1 class="page-header-text">
        <i class="far fa-qrcode"></i>
        Two-Factor Validation
    </h1>

    <div class="alert alert-info mb-3">...</div>

    <error-display error-display-model="Model.ErrorDisplay" ></error-display>

    <div class="mt-2">
        <form id="form1" action="" method="POST">
            <label class="d-block">
                Enter your Authenticator Validation Code
            </label>

            <!-- *** CAPTURE VALIDATION CODE ***  -->
            <input id="txtValidationCode" asp-for="ValidationCode"
                   class="form-control form-control-lg mt-2 mb-2"
                   placeholder="Validation code: ### ###" />

            <button type="submit" name="btnSubmit" id="btnSubmit"
                    class="btn btn-primary btn-lg">
                <i class="far fa-check-circle"></i>
                Validate
            </button>
        </form>
    </div>
</div>
full code on GitHub
The authentication 2FA validation flow is:
- Validate username/password first
- Then redirect to this 2FA Validation form
- Lookup a new Validation Code in an Authenticator
- Paste/auto-fill the value into the Validation box
- Accept
In the screen capture shown earlier I'm using 1Password as my Authenticator and it automatically fills the field and submits the form (so it happens very fast in the video). Alternately you can use a separate Authenticator app either on the same machine or your phone, and then manually type or paste in the validation code provided by the app.
The code to handle the key display and validation in the controller looks like this:
[Route("/account/twofactor")]
[HttpGet, HttpPost]
public IActionResult TwoFactorValidation(TwoFactorValidationViewModel model)
{
    if (string.IsNullOrEmpty(AppUserState.UserId))
        return RedirectToAction("Signin");

    if (model == null)
        model = CreateViewModel<TwoFactorValidationViewModel>();
    else
        InitializeViewModel(model);

    model.ReturnUrl = Request.Query["ReturnUrl"];
    if (string.IsNullOrEmpty(model.ReturnUrl))
        model.ReturnUrl = "/";

    if (Request.IsPostback())
    {
        if (string.IsNullOrEmpty(model.ValidationCode))
        {
            model.ErrorDisplay.ShowError("Please enter a validation code...");
            return View(model);
        }

        var customerBus = BusinessFactory.GetCustomerBusiness();
        var customer = customerBus.Load(AppUserState.UserId);
        if (customer == null)
            return RedirectToAction("Signin");

        var twoFactor = new TwoFactorAuthenticator();
        AppUserState.IsTwoFactorValidated = twoFactor.ValidateTwoFactorPIN(customer.TwoFactorKey, model.ValidationCode.Replace(" ",""));

        if (AppUserState.IsTwoFactorValidated)
        {
            return Redirect(model.ReturnUrl);
        }
        ErrorDisplay.ShowError("Invalid validation code. Please try again.");
    }
    return View(model);
}
full code on GitHub
This code has application specific logic in it, so you'll have to adjust for your specific scenario, but you should be able to see the flow of validation.
The key bit of code is in the Postback block:
var twoFactor = new TwoFactorAuthenticator();

// Persist the validation state for subsequent requests
AppUserState.IsTwoFactorValidated = twoFactor.ValidateTwoFactorPIN(customer.TwoFactorKey, model.ValidationCode.Replace(" ",""));
AppUserState is an internal framework component I use to hold cached state that is used throughout the application. It's persisted across requests and available at any time in the Request pipeline to give easy access to commonly accessed data like userid, username, displayname, etc. as well as some user related state like in this case the TwoFactorValidation status. Once logged in successfully both with user auth and the 2FA validation, IsAuthenticated() checks both the original login status (is there a userId) and the TwoFactorValidation status. If 2FA validation is turned off or the user decides not to use it the IsTwoFactorValidated is set to true.

The application can then at any point check AppUserState.IsAuthenticated() to check whether the user is authenticated - both for primary and 2FA auth.
AppUserState.IsAuthenticated() internally checks for both user authentication and 2FA success:
public bool IsAuthenticated()
{
    if (!wsApp.Configuration.Security.UseTwoFactorAuthentication)
        return !string.IsNullOrEmpty(UserId);
    else
    {
        return !string.IsNullOrEmpty(UserId) &&
               IsTwoFactorValidated;
    }
}
This way no other authentication code has to be changed for the rest of the application.
Handling User Login and redirecting to Two Factor
There's one more piece needed to make 2FA work in my Store app, which is integrating with the primary authentication flow on the Login form.
In my app the logic happens in the Signin Controller method:
[AllowAnonymous]
[HttpPost]
public ActionResult SignIn(SigninViewModel model)
{
    InitializeViewModel(model);

    if (!ModelState.IsValid)
    {
        model.ErrorDisplay.AddMessages(ModelState);
        model.ErrorDisplay.ShowError("Please correct the following:");
        return View(model);
    }

    // Authenticate primary Username/password
    var customerBusiness = BusinessFactory.GetCustomerBusiness();
    var customer = customerBusiness.AuthenticateAndRetrieveUser(model.Email, model.Password);
    if (customer == null)
    {
        model.ErrorDisplay.ShowError(customerBusiness.ErrorMessage);
        return View(model);
    }

    // log in user copying re-used values from customer to persist
    //
    // this also sets the `IsTwoFactorValidated=true` if
    // the it's disabled for App or the user
    SetAppUserFromCustomer(customer);

    // If two factor is enable and user has key force the
    // login. At this point `IsTwoFactorValidated=false`
    // and the user is not validated until the 2FA succeeds
    if (wsApp.Configuration.Security.UseTwoFactorAuthentication &&
        !string.IsNullOrEmpty(customer.TwoFactorKey))
    {
        return Redirect("~/account/twofactor?ReturnUrl=" + model.ReturnUrl);
    }

    if (!string.IsNullOrEmpty(model.ReturnUrl))
        return Redirect(model.ReturnUrl);

    return Redirect("/");
}

public void SetAppUserFromCustomer(Customer customer)
{
    AppUserState.Name = customer.UserDisplayName;
    AppUserState.Email = customer.Email;
    AppUserState.UserId = customer.Id;
    AppUserState.IsAdmin = customer.IsAdminUser;

    // if not using 2FA assume TwoFactor is validated
    // otherwise we have to explicitly validate first
    if (string.IsNullOrEmpty(customer.TwoFactorKey) ||
        wsApp.Configuration.Security.UseTwoFactorAuthentication)
    {
        AppUserState.IsTwoFactorValidated = true;
    }
}
full code on GitHub
Clearing Two Factor Authentication
So this is application specific - in this store the user can choose to enable two factor authentication and optionally remove it as part of their user profile.
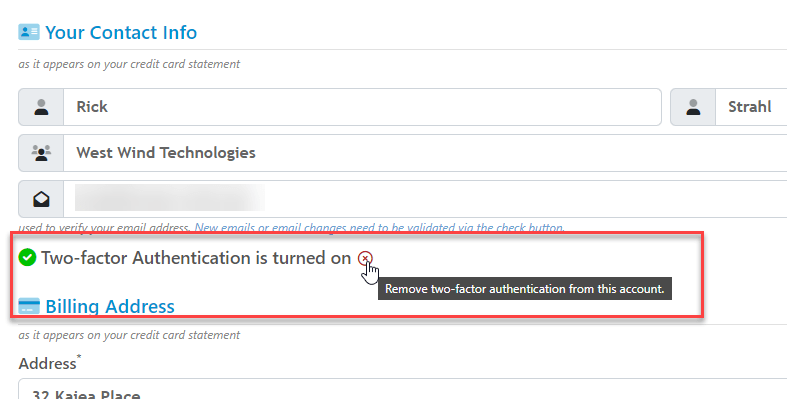
This code simply uses the code in the SetupTwoFactor Controller method, so it's really just a simple GET request:
/account/setuptwofactor?task=remove
The code in this controller method explicitly checks whether the user is authenticated, both with username and password and two factor auth:
if (!AppUserState.IsAuthenticated())
    return RedirectToAction("Profile", "Account");
and then to actually remove the 2FA the logic is simply to remove it from the user field:
// REMOVE operation
if (task.Equals("remove", StringComparison.InvariantCultureIgnoreCase))
{
    customer.TwoFactorKey = null;
    customerBus.Save();
    return RedirectToAction("Profile", "Account");
}
And that gets us full circle for Two-Factor Authentication
Summary
Considering typical complexity related to authentication, implementing a custom 2FA solution isn't terribly complicated nor requires a huge amount of code. Thanks to the great tooling available via the GoogleAuthenticator library that does most of the security related work there's not a lot of complexity involved in creating an Authenticator based 2FA solution.
I'm kind of bummed I didn't look into this sooner, but I honestly didn't quite understand how this technology worked and assumed it required a service to provide the validation codes. Turns out this functionality can be integrated into your own sites without requiring any sort of third party service.
Hopefully this article is useful to you. I'm sure I'll be back here myself, to refresh my memory how it works for the next integration.
Resources
Other Posts you might also like